Measure the opening and check the surrounding board. A tiny nail hole in firm drywall needs filler; a small open hole needs a patch system rated for its size; a larger or broken-out area needs replacement drywall with mechanical support. Do not fill a wall cavity with spackle. Resolve moisture and old-coating hazards before cutting or sanding.
In this answer
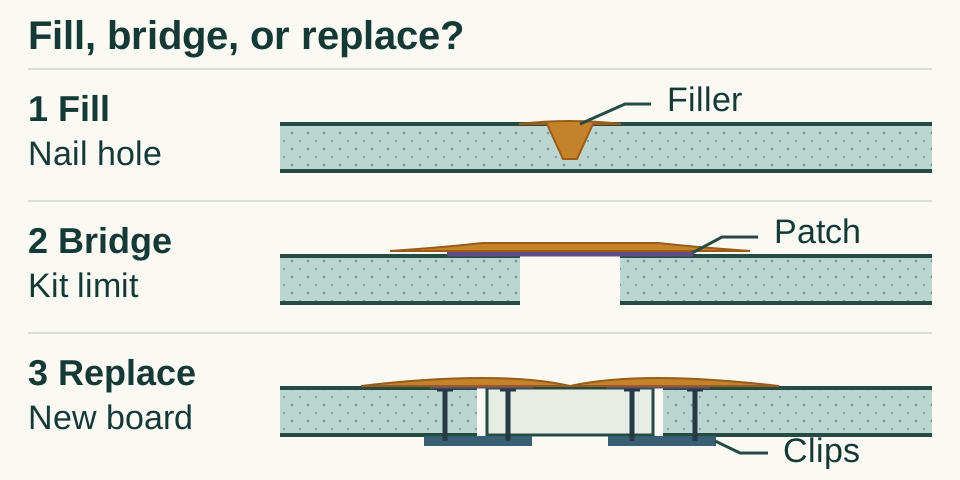
Enlarge diagram
Swipe across to see the rest of the diagram.
Pick the repair by the missing material
Use this guide for a localized repair in a dry, sound interior drywall wall. Hole diameter helps, but the condition of the edge matters too: a patch cannot bond to loose paper or crumbling gypsum. Measure the damaged area, not just the dark opening.
There is no universal “small hole” cutoff. For example, DAP’s US DRYDex Wall Repair Patch Kit, item 12345, lists holes up to 4 inches across and includes a 5-by-5-inch patch. That rating belongs to this kit; a different patch needs its own instructions.
Scroll across to read every column.
| What you have | Repair path | Check before starting |
|---|---|---|
| Tiny nail or screw hole; surrounding board is firm | Interior spackling made for small holes | A popped drywall fastener or moving crack is not an empty picture-hanger hole. |
| Small opening with sound board around it | A wall-patch kit and its specified compound | Use the kit’s maximum hole size, not the dimensions of its patch sheet. |
| Opening exceeds the kit limit, or surrounding board is broken | New drywall of matching thickness, supported with repair clips or backing | Identify concealed services and the wall assembly before cutting. |
| Wet, soft, sagging, moldy, or repeatedly cracking area | Find the cause and assess damaged material first | Cosmetic filling will not correct a leak or movement. |
Before you disturb the wall
In a pre-1978 home, determine whether the painted surface contains lead before scraping, cutting, or sanding. If the home’s age is unknown, EPA advises treating the work area as though lead paint is present. EPA recommends a lead-safe certified contractor; ordinary dust cleanup is not a substitute for lead-safe work practices.
Older patching compounds and textured coatings can also contain asbestos. Do not sand or cut a suspect material to investigate it. Have a trained, accredited asbestos professional assess it and take any necessary sample.
Leave ceiling repairs, plaster-and-lath, shower waterproofing, and fire-rated assemblies outside this basic wall repair. A garage separation or shared-unit wall may need a specified repair system. If you rent, get the property owner’s permission before altering the wall.
Gather tools for the method you chose
For a nail hole, gather suitable spackling, a putty knife, fine sanding sponge, dust protection, compatible primer, and matching paint. A patch kit adds its reinforcing patch; a board replacement also needs a matching drywall offcut, repair clips and their screws, measuring tools, a knife or drywall saw, a driver, paper joint tape, and joint compound. A wider finishing knife makes it easier to taper the repair.
Protect the floor, keep others out of the dusty work area, and use eye protection and the respiratory protection specified by the repair product. Use dust collection or the product’s permitted wet-smoothing method. These measures assume lead and asbestos concerns have already been resolved.
Fill a nail hole without leaving a mound
If filler falls into the cavity or the edge breaks away, move to the patch or replacement method. A tiny cosmetic fill is not a new anchor location for a shelf or mirror.
- Remove loose debris and gently flatten the raised rim. Keep sound face paper intact. A proud rim will show through the filler.
- Press small-hole spackling into the defect with the putty knife. Draw the blade across it to remove excess. For a deeper repair, use the product’s permitted layer thickness and let each layer dry; do not pack an unsupported opening full.
- Let the filler reach its sanding stage. Check for a hollow left by shrinkage and refill it if needed. Smooth only the raised material, remove dust, and proceed to primer.
Bridge a small opening with a matched kit
The following sequence is for the DRYDex kit named above, on clean, dry, firm interior drywall. Its patch is bedded in spackling. A peel-and-stick metal patch or a paint-only repair film can require a different sequence; do not combine their directions.
- Clear loose material around the hole. Leave enough sound surface for the entire patch perimeter to bond. If the damaged area exceeds the kit rating, replace the board instead.
- Spread the supplied spackling on the back of the patch, place it over the opening, and press its outer edges firmly onto the wall.
- Cover the patch and adjoining wall with the specified spackling. Taper the outer edge so it thins into the existing surface. Let it dry completely; this product changes from pink to white as its surface reaches the sanding stage.
- Sand the dry repair smooth and add a finishing coat if needed. Do not sand down into the reinforcing patch to flatten a bump. Widen the tapered finish instead.
Replace broken-out drywall with a supported piece
Before making a cut or driving a screw, establish what is behind the entire repair area. Look through the existing opening and use available plans and visible service routes. A wall scanner alone cannot rule out a wire or pipe. Isolate relevant electrical, water, and gas supplies safely before penetrating the wall. If you cannot establish clearance or safely isolate services, have a qualified contractor handle the opening. Do not cover an electrical box or required access point with the patch.
For a localized, non-rated wall repair, one documented option is USG Sheetrock repair clips for 1/2- or 5/8-inch drywall. Use matching board thickness and the clip system’s screws and instructions. Larger multi-stud damage or an uncertain assembly needs a repair plan rather than a bigger cosmetic patch.
- Mark a neat opening ending in sound board. With the service checks complete, remove the damaged section using controlled cuts through the board only. Do not plunge a saw blindly into the cavity.
- Slip the repair clips over the opening’s edges and fasten them through the existing drywall. USG locates these screws about 3/4 inch from the cut edge, centered between the clip’s tabs.
- Cut the replacement piece to fit with minimal gaps. Fasten it to the clips, opposite the existing-wall screws, about 3/4 inch from its edges. Keep screw heads slightly below the face without tearing the paper; remove the clip tabs as directed.
- Bed paper joint tape in joint compound across all four seams without overlapping the tape at the corners. Cover the screw heads. Use a compound approved for embedding tape, not ordinary small-hole spackling.
- After the first coat reaches its required recoating stage, apply successive wider coats to conceal the seams. Before finishing, the insert should be secure and its surface should meet the surrounding wall without a sharp step.
Wait for drying, then sand and prime
Drying-type compound must dry between coats. Setting-type compound hardens chemically and may permit another coat after it sets, but it still must dry thoroughly before decorating. The number on a bag is not a paint-ready countdown: USG Easy Sand 90 has about 90 minutes of working time and a listed setting range of 95–120 minutes. Neither means the patch is dry enough to prime.
Plan around the product’s drying instructions, coat depth, temperature, humidity, and ventilation. Do not rush from a firm surface straight to paint. If sanding smears or clogs the abrasive, stop and allow more drying.
Once dry, lightly smooth ridges with the recommended fine abrasive. Avoid exposing tape or roughening the surrounding paper. Shine a light across the wall and feel the transition: fill depressions and taper obvious edges before painting. Remove sanding dust; let any damp wiping dry.
Apply a compatible primer over exposed board and compound, including the feathered area, and let it dry for the stated interval. Priming evens out absorption; finish paint alone will not flatten a ridge. If primer reveals a missed defect, repair it, let it dry, smooth it, and reprime that repair.
Make the finish match, then know when to stop
An orange-peel or knockdown wall needs its texture matched as well as its color. Try the matching texture product on scrap first and follow its own primer and drying sequence. A smooth patch on a textured wall will remain visible even under the right paint.
Use the original paint brand, product, color, and sheen when available, and reproduce the surrounding brush or roller texture. Let the coating dry before judging it from normal viewing positions in daylight and room lighting. Higher-sheen finishes are harder to touch up.
Scroll across to read every column.
| What you see | Next move |
|---|---|
| A hard outline or shadow across the patch | Correct the shape or texture. More paint will not level it. |
| Smooth repair, but a dull or shiny island | Check primer coverage, sheen, and application texture. |
| Correct preparation still leaves a distracting color or sheen difference | Repaint the wall to its natural boundaries rather than keep enlarging touch-ups. |
| Repair blends under everyday lighting and stays intact | Stop. Save the paint label for the next repair. |
The patch is smooth, but the paint still shows?
Troubleshoot the paint matchSources
- DAP: Spackling 101 ↗
Small-hole preparation, filler selection, layered application and sanding.
- DAP: DRYDex Wall Repair Patch Kit technical data sheet ↗
Kit 12345: 4-inch maximum opening, 5-by-5-inch patch, spackling-bedded patch, drying and finishing sequence.
- USG: Sheetrock installation and finishing guide J371 ↗
Tools, screw-head paper protection, finishing coats, sanding, priming and repair overview.
- USG: Sheetrock Repair Clips application tips J1803 ↗
1/2- and 5/8-inch board compatibility, clip fixing, approximately 3/4-inch edge offsets, tape without overlaps, successive coats.
- USG: Easy Sand setting-type joint compounds submittal J621 ↗
Chemical setting, working versus setting times, thoroughly dry surfaces before decoration, dust protection.
- US EPA: Lead-Safe Renovations for DIYers ↗
Pre-1978 or unknown-age precautions; certified lead-safe contractor recommendation.
- US EPA: Learn About Asbestos ↗
Textured paint and patching compounds are potential asbestos-containing materials.
- US EPA: Protect Your Family from Exposures to Asbestos ↗
Do not disturb suspect material; accredited professional inspection and sampling.
- Bosch: GMS 120 operating and safety instructions ↗
Detector may miss wiring/plastic pipes; use other information and isolate supplies before penetration.
- Sherwin-Williams: How to Fix Paint Flashing ↗
Porosity, film thickness and spot priming of patched areas.
- Benjamin Moore: How to Touch Up Paint ↗
Color, sheen and applicator matching; more difficult glossy touch-up; whole-wall alternative.