Turn the exhaust on and check for inward airflow at the intact grille. If opening the bathroom door improves the draw, look at replacement air first. If the draw stays weak, clean the permitted cover parts, then investigate the duct route. A loud fan can still move very little air; a bigger CFM number alone won't fix a blocked outlet.
In this answer
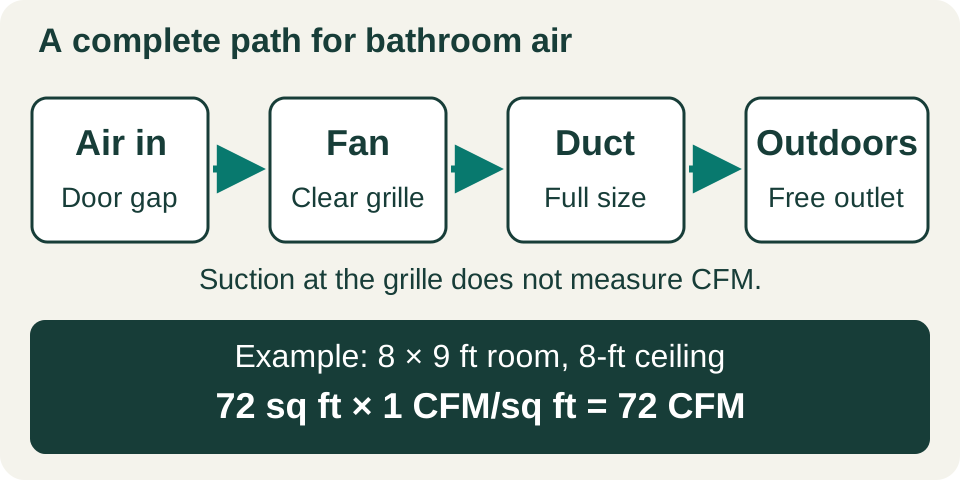
Enlarge diagram
Swipe across to see the rest of the diagram.
Check the draw, then listen
Use the fan control, not just the light switch. On a sensor or two-speed unit, select its normal shower/boost mode. Leave the grille installed. From a stable, dry position, hold a small piece of tissue at the intake slots, away from lamps or heaters, and keep hold of it. Does it pull inward? Compare with the door in its usual position, then slightly open. Never push paper through the grille.
This is a rough suction check, not a CFM measurement or proof that air reaches outdoors. Decorative grilles can also make the result difficult to interpret. Treat a weak or uncertain result as a reason to investigate, rather than a verdict that the motor needs replacing.
Scroll across to read every column.
| Observation | Useful next move |
|---|---|
| Draw improves with door ajar | Clear a rug or towel blocking the door gap. If the closed door still restricts air, ask the installer about a suitable air-transfer path. |
| Neither draw nor motor sound when shower/boost mode is selected | Confirm the correct control and mode. If the fan still will not start, request service without opening its wiring compartment. |
| Weak draw with door open or closed | Check cover dust, then the exhaust route. Motor noise does not identify where the restriction is. |
| Air draws inward, but rattling or grinding persists | After permitted cleaning and correct grille seating, arrange service for continued mechanical noise. |
| Burning smell, smoke, water at the fan or repeated breaker trips | Stop using the unit. If safe, isolate its circuit and arrange electrical/building assessment before testing again. |
Prepare for cover cleaning
Have a sturdy stepladder, vacuum with a dusting brush, soft cloth and the matching care instructions ready. Find the model in existing paperwork first; if its label is inside the housing, photograph it only after power is isolated and the owner-removable cover is safely lowered. Renters should ask building maintenance about an unidentified or shared exhaust system.
Before touching or removing parts, switch off the correct breaker and prevent someone restoring power: follow the manual's lockout or warning-tag instructions. A wall switch alone is not the isolation step. Let lamps and heaters cool. If access is unsafe, the cover resists its documented release, or removal would expose wiring work, stop there.
Clean the removable cover without soaking its electronics
First identify what actually comes off. A plastic-looking cover may contain an LED module, sensor or speaker. Do not immerse that assembly or spray cleaner into it. The washable-cover example below applies only after the manual confirms the removable part and permitted method.
- Support the grille while releasing its fasteners. For Broan Model 750, lower the grille and squeeze the two mounting springs to release it. Other covers may have screws, clips or a different release; don't pull harder to make them act like springs.
- Remove loose dust from the detached cover with a soft brush or vacuum. For a confirmed washable, non-electrical cover, use mild soap and water with a soft cloth, remove the soap residue, and dry completely. Model 750 permits mild-soap cleaning of its grille/lens assembly but prohibits immersing wood-framed assemblies.
- Keep liquids away from the installed motor, wiring and controls. The Broan Roomside/Flex guide permits vacuuming inside with a dusting-brush attachment. Stay within that owner-care procedure; don't remove the blower or bend the fan blades. If a sensor is present, use only its specific cleaning directions.
- Refit the fully dry cover using its documented attachment. Check that both springs or all fasteners are engaged and the cover sits evenly. Restore power, then repeat the same door-open/door-closed airflow comparison.
- If dust removal improves draw, keep the model's maintenance interval and check sooner if slots visibly clog again.
- If the grille is clean but suction or grinding hasn't improved, move to duct or service checks. Do not oil a permanently lubricated motor; both cited Broan manuals exclude that remedy.
Follow the air all the way outside
The route is room → grille → fan → duct → outdoor termination. A duct-free unit recirculates room air and cannot carry shower moisture outside. A duct ending in the attic, even near a roof vent, also needs correction.
From a safe ground-level position, locate the outdoor outlet if visible. Look for an obvious blockage and, where visible, whether its damper opens when the fan runs. Don't climb onto the roof or reach into an unknown nest. If you cannot identify the outlet, have maintenance or a ventilation contractor trace it.
Ask that person to check the whole run: disconnected joints, crushed or sagging duct, excessive length or sharp bends, an undersized duct, and a stuck termination damper. Duct diameter must match the fan's requirements. A reducer that lets a new fan fit an old small duct can defeat the upgrade. Also check insulation and condensation drainage where appropriate; dripping at the grille can involve the duct or a leaking exterior cap.
Work out a starting capacity
CFM means cubic feet per minute. For a bathroom up to 100 square feet with an 8-foot ceiling and intermittent exhaust, use HVI's floor-area guideline: 1 CFM per square foot, with the 50-CFM minimum in its ventilation guide. This gives you a starting capacity to compare with local requirements and the airflow the fan will actually deliver through your duct.
For example, an 8-by-9-foot bathroom has 72 square feet of floor area, giving a starting target of 72 CFM. An 80-CFM fan is a possible next size to compare, but its installed performance still depends on the duct.
Higher ceilings change the calculation. Broan's small-room method uses length × width × height × 0.13, then rounds up to the next ten CFM. The same 8-by-9-foot room with a 10-foot ceiling gives 93.6 CFM, rounded to 100. Use the chosen manufacturer's sizing method and installation limits.
Scroll across to read every column.
| Bathroom | Starting calculation |
|---|---|
| Up to 100 square feet, ordinary 8-foot ceiling | 1 CFM per square foot; at least 50 CFM. |
| More than 100 square feet | Add fixture allowances: toilet 50, shower 50, bathtub 50, jetted tub 100 CFM. |
| Example: 12 × 10-foot room: toilet, shower and separate ordinary tub | 50 + 50 + 50 = 150 CFM. |
| Enclosed toilet compartment | Plan exhaust in that compartment; one distant grille may not serve it adequately. |
Compare the installation, not just the box
For a proposed replacement, ask the written quote to separate fan replacement, any needed duct repairs, and airflow measurement after installation. You can then see which work each price covers.
- Airflow under resistance: ask for the fan's performance at the planned duct conditions. ENERGY STAR tests bathroom fans at more than one static pressure; the label does not certify your finished ductwork.
- Sound: compare sones at the same operating setting and stated test conditions. Lower sones mean quieter rated operation, not greater suction.
- Fit and controls: confirm housing dimensions, duct connection, mounting location and shower/boost control before ordering. Over-tub/shower use requires a model specifically listed for that location and its required electrical protection.
- Continuous systems: if the fan also provides whole-home ventilation, have its low and boost rates checked as a system. Do not convert it to shower-only operation using this sizing example.
Check the result after an ordinary shower
Run the exhaust during bathing. For an intermittent fan with a timer, follow its control instructions; if they give no different after-run time, start with 20 minutes after the shower, HVI's recommended minimum. Keep automatic humidity-sensing and continuous ventilation modes operating as designed. If moisture lingers, try an hour of after-run, as DOE's Building America guide recommends, and compare the results below.
Compare similar showers after cleaning or repair: does airborne steam clear more readily, and do surfaces dry between uses? Brief fog on a cold mirror can occur even with working ventilation. Persistent wetting, a growing stain or recurring damage deserves a moisture investigation.
If performance remains poor, give the contractor the model, bathroom dimensions and ceiling height, door-open comparison, cleaning result and known outlet location. For peeling finishes, use the moisture-and-paint guide once the ventilation problem has been assessed.
Has dampness started lifting the paint?
Check the moisture sourceSources
- Home Ventilating Institute: How Much Ventilation Do I Need? ↗
Intermittent sizing, 50-CFM minimum, fixture allowances, replacement air and after-run time.
- Home Ventilating Institute: Bathroom Ventilation ↗
Bathroom floor-area sizing through 100 square feet, fixture allowances and after-run guidance. The companion ventilation guide supplies the 50-CFM minimum.
- Broan-NuTone: Bath & Exhaust Ventilation Fan FAQs ↗
CFM and sones, makeup air, volume-based sizing, restrictive ducts, cold-surface fogging, outdoor exhaust and duct-free limitations.
- US Department of Energy / Pacific Northwest National Laboratory: Bathroom Exhaust Fans ↗
Complete outdoor duct path, dampers, restrictions, tissue screening versus measured airflow, continuous-system distinction and humidity runtime.
- Broan-NuTone: Roomside / Flex Series fan installation guide ↗
Service-panel isolation, vacuum dust-brush care, permanently lubricated motor, airflow losses and qualified installation.
- Broan-NuTone: Model 750 installation guide, Use and Care ↗
Spring-mounted grille removal, mild-soap cleaning, wood-frame no-immersion exception and no motor oiling.
- Panasonic North America: Exhaust Fan Maintenance ↗
Stable access, different cover fasteners, removable-cover cleaning and complete drying before reassembly.
- US EPA ENERGY STAR: Ventilation Fans Key Product Criteria ↗
Separate airflow, sound and efficiency ratings; tested performance under higher static pressure.