Wipe the faucet and sink deck dry. Watch the outlet with the faucet off, then run a small stream while checking the handle, spout base and cabinet below. Follow the first fresh water, not the puddle it reaches. If water is actively escaping into the cabinet, stop using the faucet and isolate its supply before investigating further.
In this answer
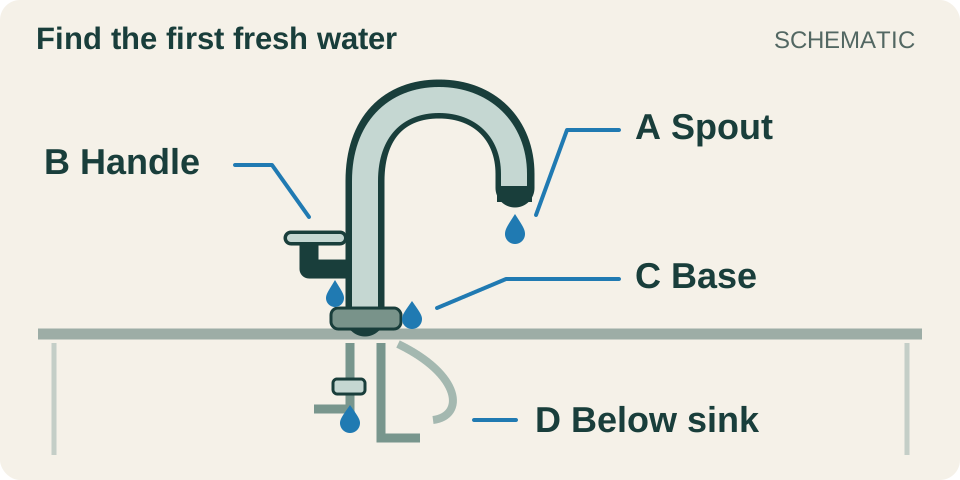
Enlarge diagram
Swipe across to see the rest of the diagram.
Make the first wet spot visible
Clear bottles and stored items from the sink deck and cabinet. Gather a flashlight, dry cloths, paper towels and a shallow catch pan. Look without touching wet outlets, cords or a disposal. Water reaching electrical equipment, a spreading cabinet leak or a shutoff that is already leaking calls for prompt plumbing help rather than a running-water test.
For a small, contained leak, leave the faucet assembled. Keep the drain open during observation so water cannot accumulate in the basin. Do not wash dishes or splash the deck during the test. Ask someone to watch below while you watch above if you cannot see both.
- With the faucet off, dry the outlet, handle joint, spout base and accessible plumbing below. Put the pan under an existing drip without pulling on hoses.
- Watch where fresh water appears while the faucet stays off. Note whether the outlet continues to drip, a handle joint becomes wet, or a connection below leaks independently of faucet use.
- If the cabinet remains dry, run a small stream into the basin. Hold a fresh paper towel against the handle-to-body joint without letting it touch the wet sink deck. Check the base with a different dry piece.
- Turn the faucet off and compare the first wet points. Repeat only if you need to separate splash from a leak; stop as soon as water escapes below. Photograph the origin and record whether the faucet was on or off.
Use the location to choose the next check
Scroll across to read every column.
| First fresh water | What to check next | Do not assume |
|---|---|---|
| A. Outlet keeps dripping with controls off | The faucet’s internal valve or cartridge repair instructions | Cleaning the outlet screen will repair the internal shutoff |
| B. Handle-to-body joint | On/off timing and the model’s handle-seal or cartridge diagram | Water collected at the base started there |
| C. Spout base or deck plate | Rule out handle runoff and splash; identify fixed versus pullout spout | Every base leak needs the same O-ring kit |
| D. Below the sink | Find the highest fresh wet connection and whether it leaks with the faucet off | A cartridge will fix a supply valve, hose or drain leak |
A persistent outlet drip needs the correct valve parts
Close the handle normally. Do not keep pressing or cranking it harder to stop the drip. Watch whether fresh drops keep forming instead of judging a single hanging drop. A short video of the continuing leak is useful when you ask for parts.
Moen identifies the cartridge as a common reason its kitchen faucets fail to shut off. That does not make a cartridge a universal purchase: Delta’s parts finder separates cartridges from seats-and-springs repairs used in some non-DST faucets. The exterior style alone cannot select the repair kit.
Handle and base leaks can lead you to different parts
If the handle paper towel gets wet first and water then runs down the body, report a handle leak. Kohler distinguishes leaks while running from leaks while off; depending on the model, seals, a cartridge or a spacer/check-valve assembly may be involved. “Replace the cartridge” is too broad without that identification.
If the handle stays dry but water starts at the base, identify the faucet layout. For its bathroom single-handle and two-handle centerset faucets, Moen includes aerator cleaning in its base-leak troubleshooting; its widespread designs have a different O-ring branch. Use that cleaning step only when your faucet matches the guidance and you have its aerator-removal method. Do not grip a hidden or stuck aerator with pliers.
For a pullout or pulldown kitchen faucet, gently extend the spray head over the basin and observe the hose-to-head connection during a brief run, provided the cabinet is dry. Moen identifies that connection’s model-specific seal as another possible source. A fixed-spout O-ring procedure is not a substitute for diagnosing a retractable hose or spray head.
Below the sink, trace upward before ordering faucet parts
Use the flashlight to distinguish the smaller water-supply tubes and faucet hoses from the larger drainpipe under the basin. Blot accessible connections separately, without loosening them, and look for fresh water higher up the path. A drop hanging from a hose may have traveled down from above.
Moen directs continuous under-sink leaks toward the shutoff valves and supply lines; leaks appearing after use also require checking the faucet’s hose connections. If fresh water starts on the drain assembly only while water leaves the basin, treat that as a drain problem. The faucet cartridge does not seal those drain joints.
Do not tighten every nut you can reach. The leaking part might be a hose wall, a quick connector or a valve stem rather than a threaded joint. Stop using a leaking supply or hose, isolate the water if safely possible, and give support the exact connection location and photograph. Leave corroded, cracked or moving pipework alone.
Identify the cartridge before taking the faucet apart
Look for a brand mark, any accessible model tag, the receipt or the installation booklet. Photograph the whole faucet, handle arrangement and spray head. Use the manufacturer’s product finder to reach the exact model and its exploded parts diagram; save the diagram and replacement part number together.
Compare the faucet’s configuration and any date or revision notes with that diagram. “Fits Moen” or “single handle” is not enough. If the model remains uncertain, send the photographs to the manufacturer before removing a handle solely to search for a cartridge number.
A useful example of why this matters: Moen’s 1255 kitchen-cartridge instructions assume the correct handle assembly has already been removed, then show a retainer nut and three locating ribs. Those details are for a confirmed 1255 installation. Another cartridge can have different retention, orientation and tools.
Isolate the water before opening the faucet
Close the identified hot and cold supplies using the shutoff valves’ own operating method. Valve types differ; do not assume every handle needs several clockwise turns. Stop if a valve resists normal hand operation, starts leaking or makes the pipe move. If the stops will not isolate the faucet, have the property manager or plumber arrange a reliable upstream shutoff.
Open the faucet controls to release remaining pressure and verify that supplied flow stops from both sides. Continuing flow means the repair is not isolated. Do not remove a handle mechanism, cartridge retainer or hose connection until isolation is established. For touchless or powered faucets, follow the model’s service isolation instructions as well.
Once isolated, cover the drain to catch small parts and lay pieces out in removal order. Follow the exact repair sheet, including its seal preparation and retainer instructions. Do not add generic grease, sealant or extra tightening. If the cartridge is stuck, the new part does not seat as shown, or retention is uncertain, leave the supplies off and get help; force is not a compatibility test.
Check the repair under pressure and during use
Fully reassemble the faucet before restoring the supplies according to its instructions. Remove the drain cover. Dry the original leak locations and the shutoffs again so new water is easy to see.
- With water restored and the faucet off, inspect the shutoffs, supply connections, handle and outlet for fresh leakage.
- Run hot and cold water, then move a swivel spout or extend a retractable head through its normal range. Check the handle, base, hose connections and cabinet while water runs.
- Turn the faucet off normally. Confirm that ongoing outlet dripping has stopped and the previously wet joints stay dry. Recheck after the next ordinary use before replacing cabinet contents.
- If leakage returns, stop use and isolate the supply where possible. Report the model, replacement part number, original leak location and whether the new leak is in the same place.
- An outdoor hose faucet needs a different diagnosis and winter procedure. Use the outdoor guide for that fixture.
Working on an outdoor hose faucet?
Read the outdoor faucet guideSources
- Moen — Bathroom Faucet: Leaking Around the Base of the Faucet ↗
Handle leakage can run onto the base; paper-towel test; distinct single-handle/centerset and widespread repair branches.
- Moen — Kitchen Faucet: Leaking From The Spout ↗
Continued outlet dripping when off generally points to the cartridge; cartridges differ and require identification. Moen kitchen faucets; not a universal cartridge diagnosis.
- Delta Faucet — Find Parts and Identify Your Product ↗
Model lookup and parts diagrams; different valve families use different cartridges, seats/springs and seals.
- Kohler — Kitchen Faucet: Leaking Under Handle ↗
Under-handle leak definition; on/off distinction; model-dependent seals, valve/cartridge and spacer/check-valve assemblies.
- Moen — Kitchen Faucet: Leaking Under The Sink Base ↗
Continuous leak versus leak after faucet use; supply shutoffs/lines versus faucet hose connections.
- Moen — How To Turn Off The Water Supply To The Faucet ↗
Supply isolation is required for faucet repairs; opening faucet controls verifies water is off.
- Moen — 1255 Cartridge: Kitchen Faucet ↗
Separate handle-removal instructions; retainer nut; three locating ribs/grooves; cartridge-specific reassembly.
- Moen — Kitchen faucet leaks at the bottom of the spout ↗
Fixed-spout O-rings differ by model; pullout/pulldown wand connection seals and some vacuum breakers need distinct diagnosis.