Clean the lint screen, then identify the separate exhaust route to outdoors. You can clean a safely accessible external connector and ground-level hood when the model permits it. Leave gas-line movement, concealed ducts and roof outlets to a qualified provider. After reassembly, check outdoor airflow and the next comparable load; a clean screen alone proves little about the duct.
In this answer
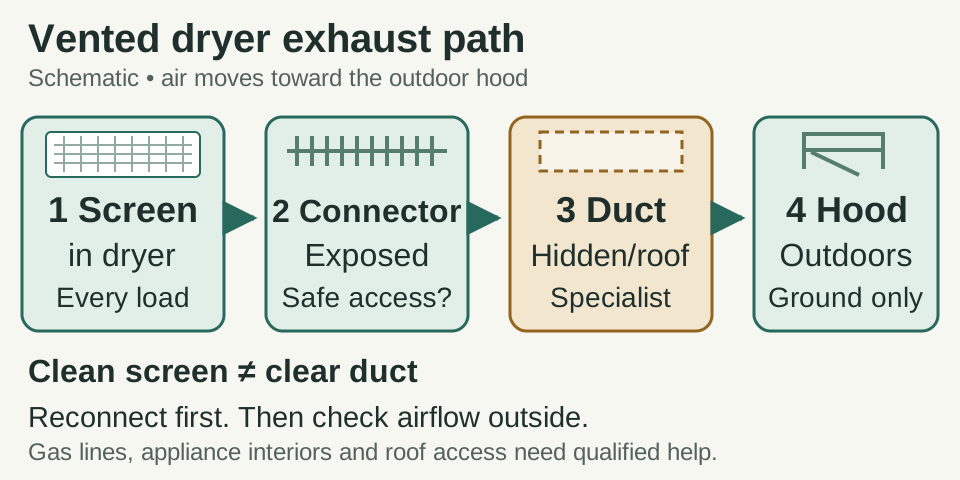
Enlarge diagram
Swipe across to see the rest of the diagram.
Find the screen, connector, duct and outlet
The lint screen is the removable mesh filter at the door opening or top of the dryer. It catches much of the lint before air leaves the machine. The exhaust system is the separate path from the dryer outlet, through a short transition connector and the house duct, to an outdoor hood. A clean screen does not show whether that downstream path is clear.
First confirm that your machine is vented. A ventless condenser or heat-pump dryer has its own filter and heat-exchanger care instructions; this outdoor-duct procedure does not apply. Do not mistake a water-drain hose for an exhaust duct.
With a vented dryer stopped and cool, remove the screen, roll off the loose lint and reinstall it securely. Clean it every load. Residue that needs washing is a separate screen-care task; use the procedure for your particular filter. Never run with a damaged, loose or missing screen.
Decide how much of the route you can safely reach
Look behind the machine without pulling on it. Locate the outdoor outlet from ground level. A duct disappearing into a wall is not evidence that you can reach its far end with a brush. In an apartment or shared laundry, ask building management who maintains the exhaust before disconnecting anything.
Stop using the dryer for a burning smell, unusual overheating, visible duct damage or a continuing airflow warning. Arrange inspection instead of running a test cycle. For smoke or fire, get out and call 911. If you smell gas, leave without operating electrical switches and call the gas supplier or fire department from outside.
Scroll across to read every column.
| What you can reach | Useful next action | Where this guide stops |
|---|---|---|
| Lint screen and its owner-accessible opening | Remove loose lint; vacuum reachable loose debris with power disconnected. | No cabinet panels, blower housing or internal teardown. |
| Freestanding electric dryer with reachable plug and connector | Unplug; clean the detachable external section if the manual permits owner cleaning. | Do not move a hardwired, stacked or heavy built-in unit yourself. |
| Gas dryer or a unit with a water connection | Clean the screen and a safely reachable outdoor hood. | Have a qualified provider handle movement that could strain lines; do not loosen, disconnect or reconnect gas fittings. |
| Concealed run, roof outlet or outlet above safe ground reach | Book whole-route cleaning and inspection. | No roof access, wall opening or blind powered brushing in this procedure. |
Clean a safely accessible external section
Have a flashlight, vacuum with hose, dryer-vent brush suitable for the duct, gloves and the correct clamp tool ready. Read the dryer and brush instructions before loosening a joint. If the dryer manual assigns exhaust cleaning to a professional, keep your work to screen care and accessible observations.
- Stop the dryer, let it cool, then unplug it before maintenance. If a freestanding electric machine must move, use a helper and follow its moving instructions. Stop if the plug, cord, water line or duct is trapped or would be pulled taut. Do not tip or unstack it.
- Photograph the exposed connector and joints so you can check their original positions. Release the permitted clamp connection without pulling a fixed duct out of the wall. Support the section as it comes free. If it is crushed, torn or coming apart, it needs correction rather than brushing.
- Vacuum loose lint from the detached section. Gently brush from each accessible end, collecting loosened lint with the vacuum. Keep the work within the external section you can control and inspect. Do not force a brush around an unknown bend or push debris deeper into a hidden run.
- At a ground-reachable hood, remove loose lint and exterior debris with the dryer off. A removable cover can come off only as its instructions allow; replace it afterward. Do not break louvers, prop the damper open or brush through a suspected animal nest. Have nesting or an inaccessible obstruction assessed.
- Vacuum spilled lint around the appliance. Reattach the connector using the specified fastening method and check that each joint is seated. Return the dryer carefully, watching that the connector stays open rather than folding or crushing against the wall. Refit the lint screen before restoring power.
Cleaning cannot repair the wrong duct
A flattened bend, torn connector or lint escaping around a loose joint calls for repair. Clearing lint alone will not correct an overlong route or too many bends. Have the installed route checked against the specific dryer’s vent chart and local requirements; there is no single maximum length that fits every model.
CPSC recommends replacing plastic or foil accordion duct with rigid or corrugated semi-rigid metal. Check the exact product before buying: Whirlpool manual W11679959B prohibits foil vent, while GE permits certain listed foil transition ducts only under strict model-specific conditions. A foil-looking hose is not proof of an approved installation.
For the Whirlpool manual cited here, flexible metal vent must remain accessible, supported and fully extended, and cannot be enclosed in walls, floors or ceilings. Joints use clamps; screws protruding into the duct and ordinary duct tape are prohibited. Other models need their own installation instructions.
The outdoor hood needs a working damper. Do not add a lint-catching screen over the exhaust opening. A vented dryer must retain its specified outdoor exhaust path; an indoor lint bucket is not a substitute in this procedure.
Check the result with the exhaust fully connected
Before cleaning, note any outdoor flap movement, visible obstruction and airflow alert you have already observed during ordinary use. Do not run a suspect machine just to create a before measurement. A photo of the blockage or crushed connector is a useful baseline.
After the route is reconnected and visible defects are corrected, perform the final operating check in your dryer’s instructions. Stay present. From a safe ground-level position, check that the outdoor damper opens and exhaust air escapes while the machine runs. Keep hands and tools out of the opening. Never disconnect the duct and exhaust into the room as your test, especially with a gas dryer.
Scroll across to read every column.
| Observation | Meaning and next action |
|---|---|
| Flap opens and exhaust is noticeably stronger than before | Encouraging, but not a measurement of adequate whole-route airflow. Complete the model’s check and watch the next normal load. |
| Flap stays shut, airflow remains weak or warning returns | Stop using the dryer and request inspection of the complete route, including the hood and concealed sections. |
| Airflow appears normal but drying still takes too long | Compare similar fabric, load size, washer spin and program. Check load/settings or appliance faults rather than repeatedly brushing the same connector. |
| Roof or high outlet cannot be observed safely | Ask the service provider to verify the outlet and report the airflow check after cleaning. Do not climb to finish this checklist. |
Set the next check from the whole route
GE recommends inspecting and cleaning exhaust ducting at least annually. A model may specify a different interval, and heavy use or a new drying slowdown can require attention sooner. Do not wait for the calendar if airflow worsens.
Record what was actually cleaned: screen, connector, hood or entire duct. If only the short connector was accessible, the concealed run remains unchecked. When booking service, give the dryer model, gas or electric type, outlet location and any alert; ask whether the quote includes the whole route, reassembly and a final airflow check.
Record which parts of the route were checked.
Open the appliance care recordSources
- U.S. Fire Administration: Clothes Dryer Fire Safety ↗
Lint screen, crushed or damaged exhaust, outdoor-cover movement and professional service.
- U.S. Consumer Product Safety Commission: Overheated Clothes Dryers Can Cause Fires, Publication 5022 ↗
Screen versus exhaust cleaning; outside air check; reconnect before use; qualified chassis cleaning; duct materials.
- Whirlpool: Gas Dryer Owner’s Manual W11679959B ↗
Safety, lint-screen care, professional exhaust service, moving care and model-bounded vent installation rules.
- Whirlpool: How to Clean a Dryer Vent from Inside and Outside ↗
Tools, unplugging, helper for moving, brush/vacuum method and ventless distinction.
- GE Appliances: Dryer: How to Clean Exhaust / Vent Duct ↗
Annual inspection, unplugging, disconnect/vacuum/reconnect and freely moving outdoor flaps.
- GE Appliances: Dryer: Things To Check For a Venting Issue ↗
Weak wall-cap airflow, kinked vent, obstructions and need to check length/elbows.
- GE Appliances: Dryer: Installation Information for Exhaust Ducting ↗
Model-specific duct requirements, tightly restricted listed foil allowance, roof termination and no outlet screen.
- GE Appliances: Dryer: Taking Too Long to Dry Clothes or Not Drying at All ↗
Load, fabric, washer extraction, program and vent condition affect drying time.
- Pacific Northwest National Laboratory / DOE Building America Solution Center: Clean Dryer Exhaust ↗
Separate outdoor cap, detachable connector and house duct; brushing/vacuuming; cover replacement and avoiding crushing.