First confirm that the cycle finished. A little water in the recessed filter well can be normal; a tubful left after draining or water that returns later needs a different check. If water is rising while the machine is idle or leaking onto the floor, stop testing and safely shut off its water supply.
In this answer
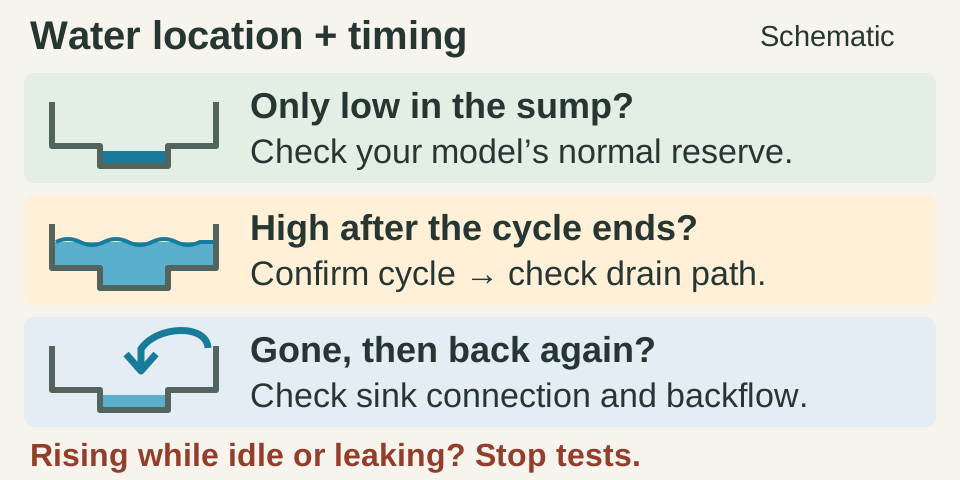
Enlarge diagram
Swipe across to see the rest of the diagram.
Locate the water before you remove it
Open the door cautiously after operation has stopped, let hot water and parts cool, and look across the tub with a flashlight. Note whether water is confined to the recessed sump around the filter or spreads over the surrounding tub floor. Photograph the level and any error code before changing anything.
There is no universal acceptable depth. GE says water in the sump is normal on models with an Ultra Fine filter, but it should not cover their tub floor. On GE models without that filter, 1–2 cups of clean water across the bottom can be normal. Whirlpool also describes a small reserve in the filter area. Match the observation to your model rather than trying to dry every recess.
Scroll across to read every column.
| What you observe | Next move |
|---|---|
| Small, stable reserve that matches the model’s normal level | Leave it alone. Normal residual water is not a clog to remove. |
| More than normal immediately after an apparently finished cycle | Check cycle completion, then the accessible filter and drain path. |
| Water drains away, then returns after sink use | Check the sink connection and backflow protection; another filter wash may miss the cause. |
| Water keeps rising while idle, or a leak/flood warning appears | Stop use. Shut off the dishwasher supply if safely reachable and arrange help. |
Give an interrupted cycle its proper drain command
A quiet machine is not necessarily finished. Check its completion indicator. Was the door opened, power interrupted, or a cycle canceled before it could finish? Use the full model number on the door-edge label to find the owner guide’s resume or cancel/drain instructions.
With filters fitted and no leak, rising water, heavy suds or electrical warning, follow that exact command and let it finish. For example, Whirlpool guide W11172759B specifies a closed door and a running cycle or delay, then holding START/Cancel for 3 seconds. Its display counts from 00:60 to 00:00 while draining. Use this example only if that guide covers your machine; it is not a universal reset sequence.
If the level drops to the documented normal reserve, the drain worked on that attempt. If it stays high, record whether you heard draining, humming or grinding, then stop repeating commands. Sound alone cannot tell you which part to replace.
If the tub is full of foam, turn the machine off and let the suds settle. Check whether hand dishwashing liquid or excess detergent was used. Follow the model’s suds-removal instructions before testing again; adding cleaner or starting another full wash is not the next step.
Isolate power, then check the accessible filter
For hands-in inspection, switch off the dishwasher’s circuit breaker and shut its water-supply valve. The control-panel Off button is not electrical isolation. Do not reach for a plug or switch through water. If you cannot safely identify the supply or isolate the appliance, stop and arrange service.
Set out towels, a bucket, a plastic cup, a flashlight and protective gloves. Once the contents are cool, scoop excess water into the bucket; use a sponge for the shallow remainder. Do not sweep your fingers through cloudy water: broken glass may be hidden there.
- Lift out the lower rack. Remove visible loose food or paper from the tub floor without reaching into an unseen opening.
- Identify the filter in the owner-care diagram. Remove and rinse only the assembly the manual permits you to remove, using its approved cleaning method. A self-cleaning system is not permission to unscrew the sump.
- Inspect the removed filter for damage, then reinstall and lock it as directed before any powered test. Stop if a tab is broken, the screen is torn or the assembly will not seat.
Check what changed under the sink
If the trouble began with a new dishwasher, disposal replacement or under-sink work, move this check ahead of filter cleaning. An installation error can block a perfectly clean machine. Look only at exposed plumbing; leave pulling out the dishwasher or disconnecting hoses to someone who can safely isolate, reconnect and leak-test them.
A newly installed disposal has a plug in its dishwasher inlet that must be removed when that inlet is used. Ask the installer to verify it against the disposal instructions. A sink that drains normally does not prove that this separate inlet is open.
- Sink backed up: stop adding water and resolve the sink blockage first. Otherwise, if the disposal operates normally, run it as its instructions direct to clear food, then switch it off. Never put your hand inside it. A jammed or leaking disposal needs its own repair.
- Visible drain hose flattened by stored items: move the items without pulling the hose or its fittings. Inspect for a sharp bend, damage or a fallen support. A damaged hose or routing that cannot be corrected without disturbing connections needs the installer or plumber.
- Hose routing: compare the exposed route with the dishwasher’s installation diagram. Check the specified high loop or air-gap arrangement and local requirements. Do not substitute a generic loop height or remove an air gap to make the hose look tidier.
If there is an air gap, inspect its accessible cap
The small fitting beside the faucet may be a dishwasher air gap, part of the plumbing rather than the appliance. Not every installation has one. With the dishwasher off, identify the fitting and follow its maker’s cap-removal instructions.
For the common design GE describes, lift off the outer cover, unscrew the inner plastic cap, remove visible debris and rinse the cap. Refit the parts before testing. Do not force a cap that releases differently. If discharge still spills from the air gap, the hose from it to the disposal or sink drain may be blocked; clearing the cap alone will not fix that downstream restriction.
Use the next result to decide who should help
After an accessible correction, refit every filter and cover, return the rack and dry spills. Test only if no leak, rising water, heavy suds, electrical warning or other stop condition remains. Restore the water supply and power, and stay nearby.
If excess water is still present, use the model-permitted drain sequence, let it finish, then check that the level visibly fell to the model’s normal reserve. If you bailed out the tub, use a model-approved short rinse or diagnostic sequence that actually fills and then drains. A drain-only run in an already-empty tub proves nothing about drainage.
After the sequence finishes, check the final tub level and exposed connections for leakage. Actual water removal, no new puddle or error, and a return to the model’s normal residual level are the useful success checks.
If water later returns, note whether ordinary sink use preceded it. Do not deliberately fill a backed-up sink to reproduce the problem. Take that timing and a photo of the hose route to a plumber or installer. If the sink drains normally but the dishwasher still leaves excess water after these checks, contact appliance service with the model, code, drain sound and checks already completed.
Repeated grinding, a burning smell, a tripping breaker, persistent drain errors or unchanged high water are reasons to stop. Do not pour drain-opening chemicals into the machine, probe an impeller, remove electrical panels or keep buying cleaning products. Bosch’s pump-cover procedure is model-dependent; if your exact manual does not give a clear owner procedure, leave that access to service.
Water entering while idle needs prompt attention even if it looks clean. Keep the dishwasher off, close its water supply if safely accessible, and call for service; if the valve will not stop active flooding, get urgent plumbing help. A Bosch E15 warning specifically means leakage protection has detected water in the base: Bosch directs owners to turn off the water inflow and contact support. Do not tilt the appliance or reset it to bypass that warning.
Save the model, drain result and service notes.
Open appliance care recordsSources
- GE Appliances: Dishwasher – Not Draining ↗
Normal residual water differs with and without an Ultra Fine filter; visible obstruction, sink/disposal checks and no drain cleaner.
- Whirlpool: Not Draining – Water Remain at End of Cycle – Dishwasher ↗
Residual filter-area water; excess suds and incorrect detergent. General Whirlpool help; the pictured reserve is not a specification for every dishwasher.
- Whirlpool: Dishwasher User Guide W11172759B ↗
Cycle completion, door/START/Cancel behavior and the 3-second hold with 00:60–00:00 drain countdown; hot-element and correct-filter cautions.
- Bosch US: Dishwasher Troubleshooting: Dishwasher is not draining ↗
Owner-manual filter removal, sharp debris, model-directed pump-cover access and service if drainage remains unresolved.
- Whirlpool: Dishwasher Not Draining ↗
Breaker and water isolation, hand bailing, short rinse after reassembly, drain-sound clues, downstream air-gap restriction and service boundaries.
- Whirlpool: Newly Installed Dishwasher Not Draining ↗
Disposal inlet knockout, kinked or misrouted hose and installation-specific air gap/high loop. Hose routing/height must match the installed model and local requirements; no universal dimension used.
- GE Appliances: Dishwasher – Cleaning the Air Gap ↗
Common outer-cover/inner-cap debris-cleaning procedure and downstream hose inspection. Only the described cap design; use fitting manufacturer instructions if different.
- GE Appliances: Dishwasher – Water in the Bottom of the Tub ↗
Dirty water can return from sink plumbing if the installation lacks correct backflow protection. Source’s 32-inch example is deliberately not generalized; exact installation governs.
- Bosch US: Dishwasher Troubleshooting: E15 Bosch Dishwasher Error Code ↗
E15 means water detected in the base; shut water inflow and contact support. Applies to Bosch E15, not a diagnosis for all error codes or all standing-water cases.