Start with the faucet model and its parts diagram. Identify whether you need a complete aerator housing, an insert inside a reusable housing, or a threaded recessed unit. Match the exact part and full thread designation, then verify its seal, flow specification and removal key. A similar diameter or a key that engages is not enough.
In this answer
Identify what is actually being replaced
Find the faucet’s full model number, including a variant or production code where the manufacturer uses one. A receipt, installation sheet or model label is stronger evidence than a photograph of a similar faucet. Open its parts diagram and find the outlet assembly. Save the replacement code and the diagram revision together.
Look underneath the spout with the water off. A visible ring may hold a separate insert. A recessed keyed insert may carry its own thread. A pull-out spray head can have an integral outlet or an inlet screen that needs a different procedure. If the parts drawing calls for a complete spray head, do not treat its face as a removable standard aerator.
If you are still deciding whether the outlet is the cause of weak flow, use the linked pressure diagnosis first. This guide starts at the ordering decision; it does not establish that a replacement is needed.
Scroll across to read every column.
| What the drawing shows | What to record | Ordering risk |
|---|---|---|
| Separate housing with an internal insert | Housing thread; insert family; washer; complete assembly or insert only | An insert listing may not include the outer ring |
| Aerator with its own external thread | Exact threaded part, seal and service-key reference | A hidden outlet is not automatically a standard CACHÉ size |
| Spray head or proprietary outlet | Faucet-specific service part and instructions | A universal ring may have nowhere to attach |
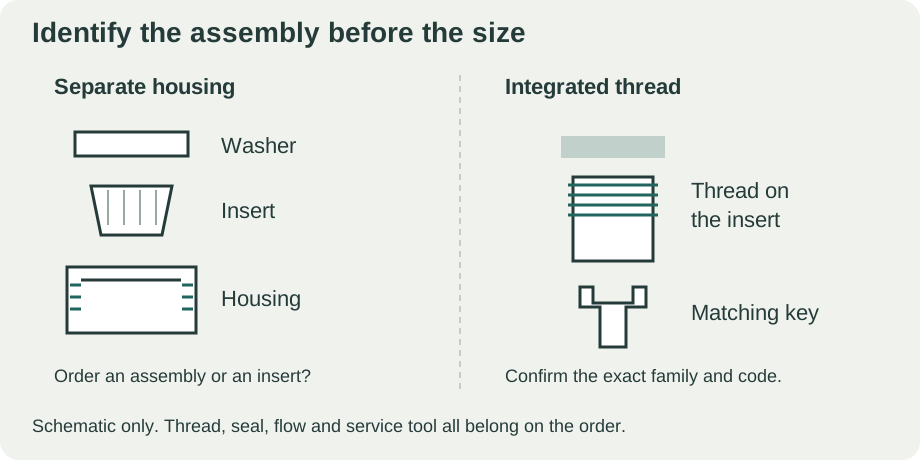
Enlarge diagram
Swipe across to see the rest of the diagram.
Use male and female to describe the replacement part
In an aerator listing, male describes thread on the outside of the replacement housing or insert; female describes thread on its inside. Record which part the description refers to. A faucet spout with an external thread receives an internally threaded housing, so copying the spout’s description into the replacement field can reverse the order.
Neoperl’s US housing list includes Regular female 55/64″–27 and male 15/16″–27 versions. Its Junior housing list instead includes female 3/4″–27 and male 13/16″–27. A size name such as Junior therefore needs its product family and full thread alongside it.
For an insert-only replacement, the insert must also match the existing housing and washer arrangement. The housing thread describes how the assembly meets the spout; it does not, by itself, identify the insert inside. Photograph separated parts in their original order if the manufacturer’s removal procedure permits it.
Separate CACHÉ sizes from ordinary housing sizes
Neoperl’s US CACHÉ page lists the four model-dependent sizes below. These are integrated-thread products that fit directly into the faucet. This is a family-specific identification table, not a complete list of all recessed faucet outlets.
Scroll across to read every column.
| Size name in this family | Thread designation |
|---|---|
| STD | M24×1 |
| JR | M21.5×1 |
| TJ | M18.5×1 |
| TT | M16.5×1 |
A diameter measurement narrows the search; it does not verify a thread
If the old part can be removed using its documented procedure, record its markings first. A caliper reading across an external thread can help a supplier identify candidates; write down that it is a measured outside diameter, not a confirmed nominal thread. An inside opening or the smooth rim of a housing is a different measurement.
Keep the entire designation. In M24×1, the nominal diameter is 24 mm and the pitch is 1 mm. In 15/16″–27, the nominal diameter is 15/16 inch and the pitch is expressed as 27 threads per inch. Converting only the diameter throws away the pitch information.
Here is an arithmetic comparison, not a test of interchangeable parts: 15/16 × 25.4 = 23.8125 mm, close to 24 mm; 25.4 ÷ 27 ≈ 0.941 mm per thread, which differs from 1 mm. A ruler can make the diameters look alike while missing the thread difference. These numbers do not authorize substituting one for the other.
If neither the markings nor the faucet diagram identifies the thread, mark it UNKNOWN and ask the manufacturer or supplier to confirm it from the model and old part. Do not trial-fit an assortment by tightening each one into the faucet. Resistance at the start is a reason to stop and check alignment and identity.
Match the flow specification and key as well
The same CACHÉ size can be supplied with different flow rates, stream patterns and functions. Copy the original or manufacturer-approved replacement’s flow marking, including units, and the exact product code. Matching the screw thread only passes the mechanical connection check; it does not preserve the faucet’s intended water use or stream.
Use the service key specified for that part. Neoperl identifies different keys for integrated-thread models and separate keys for vandal-proof housings; conventional keys do not remove those tamper-resistant versions. Coin Slot products are a distinct design. An outlet that cannot be turned by fingers is not evidence that a coin will work.
For an unfamiliar, rectangular or unusually small outlet, return to the faucet’s parts drawing. Do not enlarge notches or grip a finished spout with unprotected pliers to make a generic tool fit.
Make one complete replacement order
Write one order line containing the faucet model, replacement part number, thread, intended flow, seal and required key. State whether you want the complete assembly or just the insert. Check what the package includes; a matching insert does not replace a damaged outer housing.
Scroll across to read every column.
| Listing | Status | Next action |
|---|---|---|
| “Junior aerator” with no family or thread | Unconfirmed | Request the complete designation and product code |
| Junior housing, male 13/16″–27 | Reject for this documented outlet | Different construction and thread |
| CACHÉ M21.5×1; flow and seal unspecified | Partial match | Confirm the faucet-approved flow, part and sealing arrangement |
| Faucet manufacturer’s replacement code, compatible key and seal confirmed | Ready to order | Keep the installation instructions with the parts |
Check the seal and the result during installation
Use the faucet and replacement part’s instructions for removal and installation. Protect the drain opening so a loose component is not lost. Keep the water off while handling the outlet, and do not force a scaled, brittle or damaged part to turn.
Neoperl notes that a housed aerator’s old washer can remain in the spout. Account for it before fitting the replacement so an old seal is not accidentally left behind. For its CACHÉ replacement procedure, the maker specifies careful key engagement, protection of the O-ring, and fitting only flush with the faucet rather than driving the part farther in. That instruction is not a torque rule for every aerator.
Restore flow and inspect the joint as well as the stream. If water appears around the attachment, stop the water and revisit the part identity, seal and installation. Repeated tightening is not a substitute for correcting the wrong thread or damaged seal. A leak-free new outlet with persistently weak flow sends you back to the supply diagnosis.
Keep the part, thread and seal details together.
Open the printable parts recordSources
- Neoperl USA: Aerators with housing ↗
Components, Regular and Junior US housing threads; size names are family-specific. Checked November 5, 2026.
- Neoperl USA: CACHÉ ↗
Four listed metric sizes and variable flow/stream options. Checked November 5, 2026.
- Neoperl USA: Aerators with integrated thread ↗
Direct-to-faucet construction and service-key distinction. Checked November 5, 2026.
- Neoperl USA: Installation tools ↗
Model-specific service keys and vandal-proof exception. Checked November 5, 2026.
- Neoperl USA: Replacing a faucet aerator ↗
Washer retention, seals and installation limit for CACHÉ. Checked November 5, 2026.
- Swagelok: Thread and End Connection Identification Guide, MS-13-77 (PDF) ↗
Pages 5–9: fractional pitch versus metric pitch; a measured diameter alone does not establish the thread. Used for terminology, not faucet compatibility. Checked November 5, 2026.