Look inside the ice bin first. Loose cubes with nothing coming through the door point toward a dispensing problem. An empty bin needs production checks; unusually small or hollow cubes need a water-fill check. Read the control labels before pressing anything: Ice Off, dispenser lock and filter reset do different jobs.
In this answer
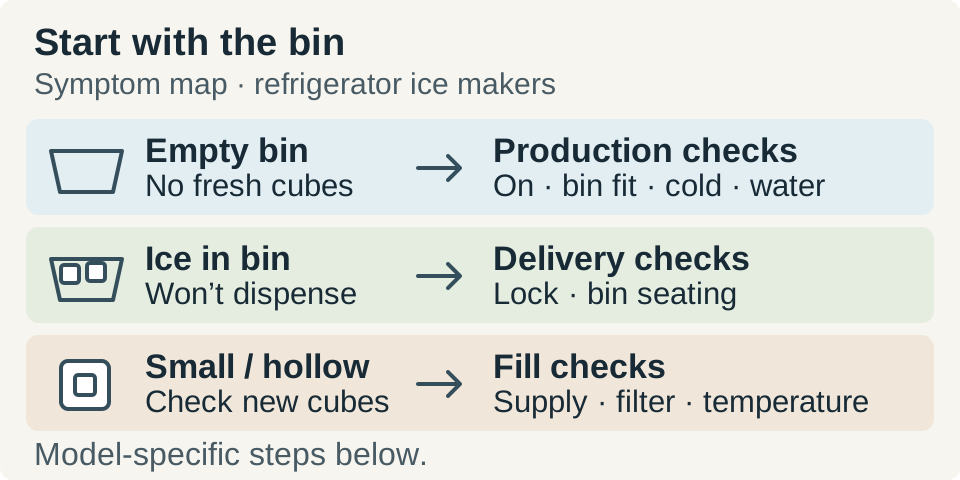
Enlarge diagram
Swipe across to see the rest of the diagram.
Pick the symptom you can actually see
This guide covers ice makers built into refrigerators. Countertop nugget machines and stand-alone undercounter ice makers have different water systems and cleaning routines. Have the full model number, its official instructions, a flashlight and a sturdy measuring container ready. For a temperature check, also have a suitable below-zero thermometer. Start with a look, without putting fingers or tools into the ice-making mechanism.
Scroll across to read every column.
| What you find | Start here | What counts as progress |
|---|---|---|
| Bin empty; no recent fresh cubes | Confirm production is on, bin fits, freezer is cold and water supply is available | Fresh cubes arrive after the applicable waiting period |
| Loose cubes in bin; none through door | Check dispenser lock and bin seating | Ice dispenses normally with doors closed |
| Cubes fused into a mass | Remove the bin only by its normal release; discard loose clumps | Bin refits and fresh, separate cubes dispense |
| New cubes are small or hollow | Check supply restriction, filter history and temperature | New batches return to the model’s normal shape |
Read the on/off label, then check the bin fit
On most Samsung models, a lit Ice Off icon means production is disabled. Samsung top-freezer models can instead have an Ice On icon that should stay lit. Dual ice makers may have separate indicators. Check the maker you actually use rather than assuming one button enabled both.
GE bottom-freezer controls also differ: some use a press-and-hold Ice button, others a touch control or a settings menu. Match the illustrated panel in the official instructions; a random three-second hold can change the wrong setting.
Follow the model’s normal bin-release procedure. Remove food or a loose scoop stored in the ice area, and check for a mound of ice blocking the full-bin detector. Do not bend or force a sensing arm. Reinstall the bin fully and close the door.
- Specific Samsung exception: on dual cubed/ice-bites models, the scoop holder belongs at the front when the bucket is installed. A REAR marking on the holder describes its attachment to the bucket, not the bucket’s direction in the freezer.
For an empty bin, check cold and water separately
A refrigerator can keep drinks cool while its ice maker is still too warm. GE’s cited bottom-freezer guidance recommends 0°F in the freezer and 37°F in the fresh-food compartment. Use your model’s recommended settings. Clear a package that prevents the door from closing; do not keep lowering the setting to compensate for a door that stays ajar.
A control setting alone does not establish the temperature inside. GE’s freezer-check method uses a bulb or candy thermometer capable of reading below 0°F. Place it between two food packages that have been in the freezer for more than 24 hours, on the middle shelf or near the center. Leave it there for at least three minutes before reading. Compare with the range in your model’s temperature-check instructions; a momentary reading need not equal the setpoint. This food-package check cannot be used immediately after a new installation. If the freezer is not reaching its recommended range, address cooling before judging ice output.
- Look at the accessible water-supply route, especially if the refrigerator was recently moved. Check for a visibly pinched or sharply bent tube. Do not pull out a built-in or heavy refrigerator just to inspect behind it; have the installer check inaccessible tubing.
- Confirm the identified refrigerator supply valve is open as its instructions require. Do not force a stiff, corroded or leaking valve, disconnect tubing, or drill a valve opening. A damaged line or uncertain shutoff needs a plumber.
- If the refrigerator has a water dispenser, compare its flow with its usual steady stream. Weak flow or sputtering after a filter change makes the filter/flush check below the useful next step. Normal dispenser flow does not by itself prove water is reaching the ice mold. With no dispenser, use the model’s water-supply troubleshooting instructions. Do not pour water into the ice maker unless the manufacturer explicitly directs that test for your model.
For a stocked bin, work on delivery
A dispenser lock can block delivery even while ice production continues. Unlock it using the panel instructions, select cubed ice and test with a sturdy container and the doors fully closed. Do not reach into the chute while operating it.
If cubes are fused, use the normal bin release and tip out clumps that come free. Do not chip the mass with a knife or pound the bucket. If the bin will not release normally, stop. Samsung specifically warns against forcing a frozen bucket or using a hair dryer to thaw it; that condition needs service.
For the removable Samsung bins covered by its dispenser guide, ice fragments can obstruct the bin outlet. After removing and emptying the bin, its guide allows warm water through that opening, followed by complete drying before refitting. Apply this only to a removable bin your instructions allow you to rinse. Do not pour water into the installed ice maker or electrical housing.
Seat and latch the bin completely, then retry once it contains loose cubes. A motor sound without delivery can mean the bin is not engaging correctly. If reseating does not restore delivery, report whether the motor is silent or audible; neither observation alone identifies a part to replace.
After a filter change, finish the matching flush
If the trouble started immediately after replacement, check the filter’s exact part match and locked position before buying another one. Follow the removal instructions before reseating it; some systems need pressure relieved first. Stop if the housing leaks. A filter-light reset only updates the reminder; it does not flush air or repair the ice maker.
Use the examples below only if they match your refrigerator’s instructions. With no dispenser, find its separate flushing and ice-discard directions. Do not run an unknown filter system without its cartridge or substitute a bypass plug. After flushing, recheck for leaks, confirm production is enabled, and judge fresh ice rather than cubes left from before the change.
Scroll across to read every column.
| Confirmed source scope | Post-installation procedure |
|---|---|
| GE bottom-freezer support guide | After correct filter installation, dispense 2 gallons through the water dispenser to clear air. |
| Whirlpool manual W10322936A, printed page 10 | Use a sturdy container: dispense for 5 seconds, release for 5 seconds. Repeat until water flows, then continue that pattern until 4 gallons total have been dispensed. Additional flushing may be needed. |
Small or hollow cubes are a different clue
Compare cubes from the bin before they pass through a crusher. Small fragments from crushed-ice dispensing are not evidence of an underfilled mold. For genuinely undersized or hollow new cubes, revisit the visible supply line and filter: a restriction can reduce each fill.
Do not automatically turn the freezer colder. GE notes that temperatures below -10°F can also produce hollow cubes in the designs it describes. Return to the model’s recommended setting and assess new batches. If a correctly fitted replacement filter and accessible supply checks do not improve the ice, have water delivery assessed before replacing the ice maker.
Give the correction a defined test
Leave the doors closed as much as practical and note when the correction was made. First cubes and a full supply are different milestones:
- New GE installation: its support guide allows up to 24 hours for the ice maker to become cold enough to produce ice.
- Whirlpool units covered by W10322936A: allow 24 hours for initial production and 72 hours for full production. The manual also directs discarding the first three batches. These are installation instructions, not permission to ignore a leak or a warming freezer.
- After a setting, bin or filter correction on an established machine, look up the recovery interval in the manufacturer’s troubleshooting guide for your full model number. If none is given, contact its support team for an expected first-batch time and next step. GE’s cited bottom-freezer guide allows 24 hours between temperature adjustments; avoid further changes during that wait. Then check for fresh cubes, normal shape and successful dispensing.
- Arrange service if the model-specific recovery period passes without improvement or a frozen-bin problem returns. Give the technician the model, symptom, filter part, recent installation or water-line changes, correction time and result. Leave internal wiring, valves and heater work to the technician.
Give service the model and the result of your checks.
Make an appliance recordSources
- GE Appliances: Bottom Freezer Refrigerator - Not Making Ice ↗
GE bottom-freezer controls, temperature recommendations and two-gallon post-filter flush. Control layouts differ by model.
- GE Appliances: Refrigerator - Hollow, Mushy, or Small Ice Cubes ↗
GE ice-maker designs covered by this guide: restricted fill and exceptionally cold temperatures as causes of hollow cubes.
- GE Appliances: Refrigerator - New Icemaker Not Producing Ice ↗
New GE refrigerator or new refrigerator ice maker; first cooling can take up to 24 hours; units may ship off. Not freestanding or countertop ice makers.
- Samsung US: Samsung ice maker is not working ↗
Samsung control labels, dual cubed/ice-bites bucket orientation and frozen-bin service limits. Exact controls and bucket removal depend on the model.
- Samsung US: Issues with Samsung refrigerator ice dispensers ↗
Samsung dispenser lock, fused cubes, removable-bin outlet rinsing, thorough drying and bin seating. Confirm the bin is removable and washable.
- Whirlpool: Refrigerator User Instructions W10322936A ↗
Only refrigerators using W10322936A: printed pages 10–12 cover flushing and filter/bin care; page 15 gives initial and full-production timing.
- GE Appliances: Refrigerator - Icemaker Doesn't Fill With Water ↗
GE explains the separate downstream water paths and why a working dispenser can coexist with a frozen ice-maker fill tube requiring service.
- GE Appliances: Refrigerator - Not Dispensing Ice ↗
GE dispenser checks: close the doors, identify frozen bin contents and arrange service if the condition returns.
- GE Appliances: Freezer - Measuring Temperature ↗
GE freezer-section measurement: below-zero-capable bulb or candy thermometer between food packages stored over 24 hours, near the middle, at least three minutes before reading.