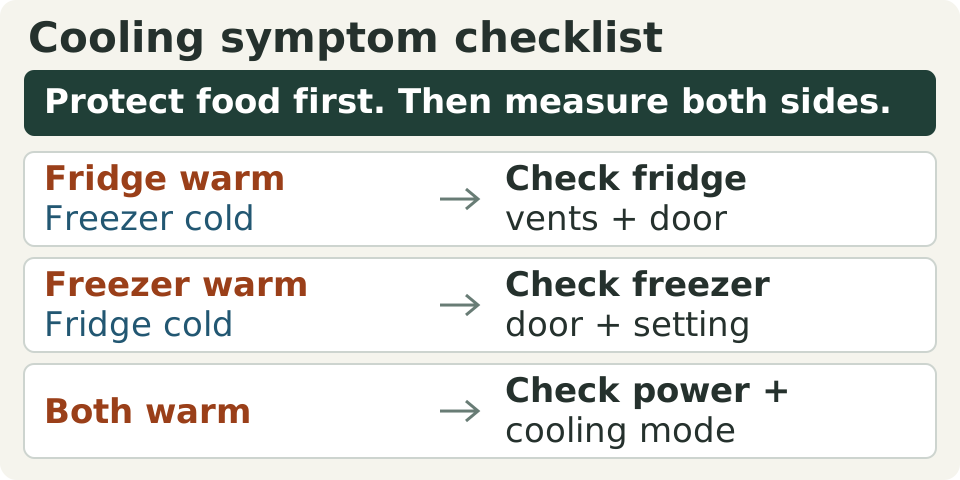
First protect the food: keep refrigerated perishables at 40°F or below, and discard them if they have been above 40°F for more than two hours or their warm-time history is uncertain. Then measure the refrigerator and freezer separately. A cold freezer with a warm refrigerator calls for different checks from two warm compartments. A display set to 37°F does not prove the food is cold.
In this answer
Enlarge diagram
Swipe across to see the rest of the diagram.
Handle the food before starting a cooling test
Move still-safe perishables to a working refrigerator or an iced cooler that you can verify stays at 40°F or below. Keep raw meat contained so it cannot drip onto ready-to-eat food. Rechilling does not make food safe after excessive warm exposure. Smell, appearance and a taste test cannot establish safety. If perishables are out in air above 90°F, the FDA’s room-temperature limit is one hour rather than two; keep them in verified cold storage while you investigate.
If the refrigerator has been warm overnight and you do not know when the temperature rose, do not start a new two-hour clock when you discover it. Discard questionable perishables such as meat, milk, eggs and leftovers. Use the federal food-by-food chart for other items; hard cheese and whole, uncut produce are not treated the same as milk or cooked food.
For a known power outage, a previously cold refrigerator with its doors kept closed can protect food for about four hours. That estimate does not apply to a refrigerator that was already warm or repeatedly opened. Do not add four hours to a known period above 40°F.
Check frozen packages individually. Many foods can be refrozen if ice crystals remain or they measure 40°F or below, although quality may suffer. The chart has exceptions, including ice cream. A freezer above its 0°F storage target does not automatically mean every package must be discarded.
Measure both compartments, not just the display
Use two appliance thermometers, one rated for freezer temperatures, plus a food thermometer when checking individual foods. Read each instrument’s placement and settling instructions. Record the time, measured temperature and control setting separately. The refrigerator should stay at or below 40°F; the freezer’s storage target is 0°F.
A panel may show the requested temperature rather than a live reading. Also, air warms during door openings and automatic defrost. One reading taken with the door open cannot show the temperature history of the food.
For a steadier fresh-food performance check, GE recommends measuring a food or liquid container that has already been inside for at least 24 hours. Use a suitable food thermometer and the model’s specified location. A dedicated container of water avoids using suspect food for this check. This is a later appliance check, never a reason to leave questionable perishables inside overnight.
Scroll across to read every column.
| What you find | First checks | What it does not prove |
|---|---|---|
| Refrigerator warm; freezer near its target | Refrigerator door, blocked supply and return vents, correct controls | A cold freezer does not certify refrigerator food safety. |
| Refrigerator at or below 40°F; freezer too warm | Freezer drawer closure, freezer setting, recent loading and room conditions | Cold refrigerator food does not prove the freezer works. |
| Both compartments warm | Power interruption, cooling switched off, demo mode, doors and installation | Lights or a running sound do not prove cooling. |
| Both temperatures normal; no new ice | Use the model’s ice-maker troubleshooting path | An empty ice bin alone is not a cooling diagnosis. |
Check what changed, then check the controls
An error code may call for service immediately. Read its model-specific meaning. Do not use an internet reset sequence as a universal repair or keep restarting the refrigerator to erase a recurring warning.
- Note whether this started after delivery, a move, a power outage, cleaning, a large grocery load or a door left ajar. Photograph the display and any error code before changing anything.
- If both compartments are warm, check whether the home has power and the refrigerator’s accessible plug is seated. Do not pull out a heavy or built-in appliance, open electrical covers or probe an outlet to do this check. Repeated breaker trips, a damaged cord or burning odor need prompt professional attention.
- Confirm cooling is enabled for each applicable compartment. Whirlpool notes that some models need cooling switched back on after an outage. On Samsung models, displays such as OF OF or O FF can indicate Cooling Off mode. Use the matching model’s instructions to exit it; button combinations differ.
- Compare the controls with the recommended starting settings in the manual. A numbered dial is not a temperature in degrees. Some Whirlpool top-freezer models also have an airflow control that divides cold air between compartments; start at its Recommended position rather than turning every control to maximum.
Make the doors close and the vents visible
Many refrigerator-freezers send cold air from the freezer through vents into the refrigerator. That makes an obstruction a useful first check when only the refrigerator is warm. Other designs have separate cooling arrangements, so the symptom alone cannot identify a failed fan, damper or compressor.
A vent buried in ice is different from a vent covered by a cereal box. Photograph it and use the model’s defrost or service instructions after protecting the food. Do not chip ice with a sharp tool or use a hair dryer. If heavy frost returns, arrange service rather than repeatedly thawing it as a workaround.
- Check for a tray, carton or freezer bag projecting beyond the shelf. Push drawers and bins fully home without forcing them. Remove missed packing material on a new appliance. Close each door and look around its full edge for an obvious gap.
- Wipe crumbs and sticky residue from the gasket with a soft cloth and mild soapy water, then dry it. Look for splits or a distorted section. For the Samsung seal check, close the door on a strip of paper and gently pull; slight resistance is expected. A loose spot after cleaning needs a closure or seal check, not an automatic gasket purchase.
- Find the interior vents using the manual’s diagram. Move containers away from both the openings that supply cold air and the return openings. Leave air paths between packages; do not cover shelves with liners that block those paths. Check the freezer as well as the refrigerator.
Check the room and exterior airflow without opening the cabinet
Look for a rug, stored bag or new trim blocking the base grille. Compare the visible top, side and rear clearances with the installation instructions. Required gaps differ by model; a freestanding refrigerator and a built-in unit do not share one clearance rule.
For a garage refrigerator, record the room temperature and check the appliance’s operating range. A room that feels cool is not proof the freezer will stay frozen. Indoor-only and garage-ready models have different limits. Do not add a heater or aftermarket garage kit to compensate.
Condenser cleaning is model-dependent. Some coils are owner-cleanable, some need no routine cleaning, and others require a technician. If the manual specifies accessible cleaning, disconnect power and follow that procedure. Do not remove rear electrical covers or reach into fans and wiring. Internal electrical and refrigerant repairs belong to qualified service.
Recheck on the model’s schedule, with food protected
Make one settings change at a time and note when you made it. Close the doors and use the manufacturer’s recheck interval. Whirlpool’s new-installation guidance allows up to 24 hours to stabilize; its top-freezer guidance also calls for 24 hours between control adjustments. Samsung’s temperature-setting guidance allows up to 28 hours with doors closed. These are different operating situations, not a universal waiting period.
Keep food safely elsewhere throughout an uncertain recovery. A newly installed refrigerator is ready for groceries when it actually reaches the required temperatures, not simply because a day has passed. If an established refrigerator suddenly stops cooling, both compartments remain warm with cooling enabled, or the model’s recheck window ends without acceptable temperatures, arrange service.
Success means the measured refrigerator temperature stays at or below 40°F and the freezer returns to its storage target under normal use. A cooler-feeling shelf or disappearing alarm is not enough. If the temperature falls and then rises again, save those readings for service instead of repeatedly making the setting colder.
Keep the model, manual and cooling readings together.
Open appliance care recordsSources
- US Food and Drug Administration: Refrigerator Thermometers: Cold Facts about Food Safety ↗
Food-storage targets, thermometer use, uncertain warm history, safe handling and the limits of smell or appearance.
- FoodSafety.gov: Food Safety During Power Outage ↗
Four-hour closed-refrigerator estimate and item-specific discard/refreeze decisions, including ice cream.
- GE Appliances: Refrigerator: Measuring Internal Temperatures ↗
Setpoint versus actual display, door/defrost fluctuations and a stabilized food/liquid measurement.
- Whirlpool Product Help: How to Check the Air Vents for Blockage: Ensuring Proper Air Flow ↗
Model-dependent vent locations, supply/return circulation and obstructions.
- Whirlpool Product Help: Not Cooling: Top Freezer Refrigerator ↗
Cooling after outages, demo mode, numbered and airflow controls, loads, and 24-hour adjustment guidance.
- Samsung US Support: Cooling Issues with Samsung Refrigerator or Freezer ↗
Compartment-specific triage, Cooling Off displays, door paper test, errors and up-to-28-hour temperature-setting recovery.
- GE Appliances: Refrigerator: Not Cooling Enough ↗
Door obstruction checks, model-specific clearance, owner-manual condenser cleaning and service escalation.
- Samsung US Support: Frost Forms in the Samsung Freezer, Refrigerator, or Ice Bucket ↗
Heavy frost needs a different branch; clean/dry seals and do not use a hair dryer.
- Whirlpool Product Help: How Long to Wait Before Adding Food to a New Refrigerator ↗
New-installation stabilization and waiting for actual food-safe temperatures before stocking.
- Whirlpool: Why Is My Refrigerator Not Cooling? 7 Possible Causes and Fixes ↗
Repeated breaker trips warrant professional attention; internal component repairs need a qualified technician.
- GE Appliances: Refrigerator: Installation Location and Temperature ↗
Indoor versus garage-ready temperature limits and no aftermarket heater/garage kits.