If the bowl rises unusually high or drains slowly, stop flushing and close the accessible toilet supply valve if it turns normally. If the bowl is at its usual level, check whether a gravity tank has finished filling and whether the handle actually opens its flush outlet. Do not keep flushing to find out.
In this answer
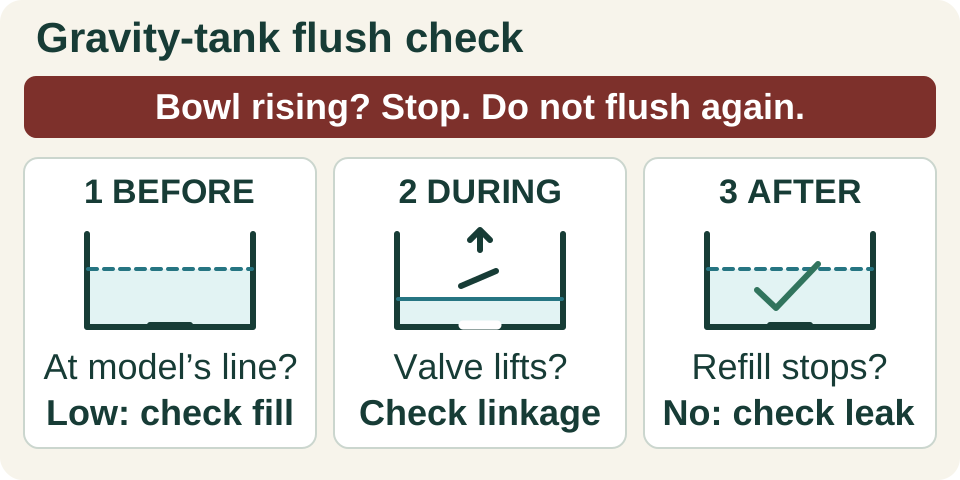
Enlarge diagram
Swipe across to see the rest of the diagram.
If the bowl is rising, deal with that first
Close the toilet’s supply stop, usually behind the bowl, without forcing a stiff or corroded valve. A conventional round handle closes clockwise; a quarter-turn stop moves only to its closed position. This stops further supply water, not water already leaving the tank. Keep others from using the toilet.
Wait for the bowl level to fall. Do not add a bucket of water or trigger another flush. If it stays too high to plunge without spilling, leave it out of use and get plumbing help. Water backing up into a tub or another fixture calls for prompt drain service, not tank adjustments.
Do not add drain-opening chemicals or mix cleaners. If someone already poured in a drain opener, do not plunge or add another product; tell the plumber exactly what was used. Wear gloves and eye protection for work around bowl water.
Check which flushing system you have
The tank checks below are for an accessible gravity tank with standing water and a flapper or canister outlet. Set a removable ceramic lid on a towel on the floor. Do not pull up a lid attached to buttons, rods or a cable; use its release instructions. Photograph the model marking and the untouched parts first.
A sealed pressure vessel inside the tank means pressure-assisted equipment. Do not open the vessel, loosen its cartridge or apply gravity-tank water-level adjustments. Closing the supply alone does not depressurize it. Use the flushing-system model for manufacturer support or service.
Dual-flush toilets may use buttons and rods rather than a handle and chain. Confirm which control provides the full flush for solids before diagnosing a weak flush. Concealed tanks and electronic toilets need their own access and operating instructions. For an auto-flushing toilet with a clog, prevent automatic operation using its manual; TOTO’s cited NEOREST manual requires unplugging. Do not touch a wet plug or reach through standing water.
Watch the tank before, during and after
Have a flashlight and towel ready. First look without flushing. Only observe a flush when the bowl has returned to its normal level, there is no sign of a remaining blockage, and you can reach a working supply stop. If a clog is suspected, use the clog branch before this test.
For a gravity tank, find the manufacturer’s waterline mark or the specified level in its manual. A stain inside the tank is not necessarily that mark. There is no single correct distance below the overflow for every toilet.
Scroll across to read every column.
| When | Observation | Next check |
|---|---|---|
| Before | Tank is empty, still filling, or stops below its specified line | Supply and fill branch below; wait for a complete refill |
| During one safe flush | Handle moves but flapper/canister does not lift; tank level barely changes | Handle, chain or the identified flush mechanism |
| During one safe flush | Tank releases water but bowl rises and falls slowly | Stop testing; investigate a bowl or drain obstruction |
| After refill | Tank reaches its line but bowl remains unusually low | Refill-tube connection and model-specific bowl refill path |
| After refill | Water keeps flowing or refill starts again without use | Running/leaking-tank diagnosis rather than more flush tests |
Low or empty tank: check the refill, not the drain
Start with these visible checks before buying a fill valve. Keep the supply connected; none of these observations requires removing the valve cap or taking the tank off.
- Let any refill finish. A flush started before the tank is ready is not a useful performance test. If it never finishes, note whether water is still entering or has stopped short of the marked level.
- Look at the supply stop and flexible connector. If the stop was deliberately closed after a leak, do not reopen it until that problem is repaired. Otherwise, confirm it is fully open only if it operates freely. Look for a visibly kinked connector; do not disconnect or twist a damaged hose.
- Watch the accessible float. A chain or loose hose should not trap it. Reposition only an obvious loose obstruction without bending the float arm or forcing hidden parts.
- If filling stops consistently below the specified level, identify the fill-valve model and its user adjustment. Set it to the toilet’s marked level using those instructions. Do not raise it above the mark to compensate for a poor flush. An unmarked tank needs its model’s specification first.
- If the tank stays empty or fills very slowly with an open stop and an unrestricted connector, have the supply or fill valve checked. Use matching service instructions and a working shutoff before any valve repair.
Full tank, little release: follow the handle’s movement
On a chain-operated gravity toilet, watch the lever arm pull the chain and lift the flapper or canister during the safe observation flush. A detached clip, tangled chain or excessive slack can leave the outlet shut. With the supply off, reconnect a clearly detached intact clip at its original attachment, or free a visible tangle. Leave the model’s specified slack so the outlet can close completely; do not make the chain taut.
If a weak flush began after a part replacement, check that the flapper and any adjustable setting match the toilet. Holding a normally momentary handle down is a clue, not a repair or proof of a clog. A brief canister lift alone is not a fault: Kohler’s Class Five and Aquapiston systems use a short release and retain tank water. Do not judge performance by whether the tank empties.
For push-button mechanisms, inspect only what the manual makes accessible: rods or cables may be disconnected or misadjusted. Do not copy a chain adjustment or cut rods by guesswork. A broken lever, damaged seal assembly or uncertain replacement part needs a model-matched repair.
Bowl clog: use a toilet plunger after the level falls
Use a toilet plunger with a flange or head that seals the bowl outlet. Keep the supply off during plunging. If a toy or other hard object fell in, retrieve it only if plainly visible and safely reachable with gloves; do not drive it deeper. An unreachable object needs removal by a plumber.
- Wait until there is room for the plunger without sending water over the rim. Tilt its head into the water so trapped air escapes, then center it over the outlet.
- Keep the seal and use controlled push-and-pull strokes. Start gently to avoid splashing. Pause after several strokes and watch whether the bowl drains freely.
- If it remains slow, is still high, or improves only briefly, stop flush testing. A toilet-specific auger or professional clearing may be needed; do not substitute an unprotected metal drain snake that can damage the bowl.
Tank works, but the flush is still weak
If the bowl refills too low, inspect the small refill hose. On many conventional systems it is held by a clip at the overflow; certain Kohler canisters use a dedicated port at the top. Restore only the connection shown for your model. Do not stuff a loose hose deep into the overflow or leave its end submerged, which can siphon water from the tank.
If bowl refill is normal but the wash is weak or uneven, look for visible deposits at the rim outlets. Clean accessible surfaces with a toilet brush and an in-bowl cleaner approved for that finish, following its label. Do not pour cleaner into the tank or pick at coated surfaces with metal. Persistent internal deposits need the manufacturer’s cleaning method.
Repeated clogs, gurgling elsewhere, or a bowl that rises despite a normal tank release can involve the waste line or vent. Have a plumber investigate; do not climb onto the roof. A new toilet that has never flushed properly also needs its installation checked.
A successful test has four parts
Once the bowl drains freely and the cause has been corrected, reopen the supply gently and wait for refill. With no added test load, make one normal flush, using the full-flush control where applicable. Watch through the refill, then put the lid back securely.
If the problem remains or comes back
If that test fails, stop and report the tank level, outlet movement and bowl response to the plumber. Shut off the supply for an active leak or overflow risk.
If it passes but the same problem returns during normal use, the repair is not established. Get the recurring restriction or mechanism fault checked.
If flushing works but water keeps trickling or the tank refills between uses, switch to a running-toilet diagnosis. That calls for leak and shutoff checks, not repeated flushing or a higher tank level.
Need drain or toilet repair? Compare the same scope.
Compare service quotesSources
- How to Stop a Toilet Bowl from Overflowing ↗
Supply shutoff, no repeated flushing, and waiting for a high bowl to fall before plunging. Overflow triage; the article does not assume closing the supply stops water already in the tank.
- How to Plunge a Toilet ↗
Toilet-plunger seal, water-filled head, slow push/pull strokes, drainage and final flush check; foreign-object exception.
- How to Fix a Slow or Weak Flushing Toilet ↗
Chain slack, incorrect flapper, refill tube, low float setting and obstructed rim outlets as different causes. Gravity tanks; no universal flapper or Korky valve-height procedure is prescribed.
- How to Fix a Slow-Filling Toilet Tank ↗
Supply-stop position, kinked supply line and fill-valve sediment as causes of slow or absent refill. Accessible observation; valve disassembly and supply-line removal are outside this article.
- Dual-Flush Toilet Homeowners Guide, 1058763-5-A ↗
Printed pages 6–7: waterline target, poor/no flush, push-button rods, waste/vent obstruction, and continuous running.
- Tank Leak – Fill Valve Hose Position ↗
Non-canister clip versus canister top-port routing; submerged hose-end siphoning. Kohler configurations shown; other models must match their own refill-path diagram.
- Poor Flush ↗
Rising/slow-falling bowl, repeated clogs, other-drain sounds and bubbles can accompany waste-stack or vent obstruction.
- Owners Operation and Installation Guide: 503, 503H, 503UH and 504 ↗
Safety warning on PDF page 2: pressure remains in the vessel and must be released before service; operation depends on supply pressure. Scope: the pressure-assisted models listed in this guide.
- NEOREST AH/RH Instruction Manual: MS988CUMFG and MS989CUMFG ↗
Printed pages 4–8: electrical safety, no unauthorized disassembly and unplugging a clogged unit to prevent automatic-flush overflow.
- EarlyAction / Dual-Force Foamer: precautions ↗
Precautions prohibit toilet use, plunging with product present and mixing with other cleaners or chemicals. Used only for chemical safety; no chemical drain-opener treatment recommended.
- The Flush Valve is Closing too Fast ↗
Short canister opening and retained tank water can be normal on Class Five/Aquapiston bulk-flush systems. Scope: the named Kohler canister systems.