Measure the bowl from the midpoint between the seat-fixing holes to its front outside edge. Record the hole spacing, bowl width and access to the fixings as separate checks. Round or elongated narrows the search; the selected seat’s drawing and mounting instructions establish whether it fits.
In this answer
Find the fixing line before measuring length
Raise the lid and ring so the ceramic rim is visible. Identify the two seat-fixing locations at the rear. A removable cover can hide a screw, but a decorative cap’s edge is not the center of the fixing hole. If the centers cannot be located without dismantling an unfamiliar hinge, find the toilet and seat model first; record the measurement as unconfirmed.
Measure center to center across the two fixing holes. Mark the midpoint on your sketch, then measure straight forward from that line to the outside front edge of the bowl. Keep the tape along the bowl’s centerline rather than following the curved rim. Separately record the widest outside width and the space behind the fixing line toward the tank.
Bemis uses approximately 16½ inches for a round bowl and 18½ inches for an elongated bowl, with 5½-inch fixing-hole centers as a common US arrangement. These are identification clues for those bowl families, not a specification for every toilet. A specialty outline, unusual hole pattern or uncertain measurement needs the toilet manufacturer’s compatible-seat information.
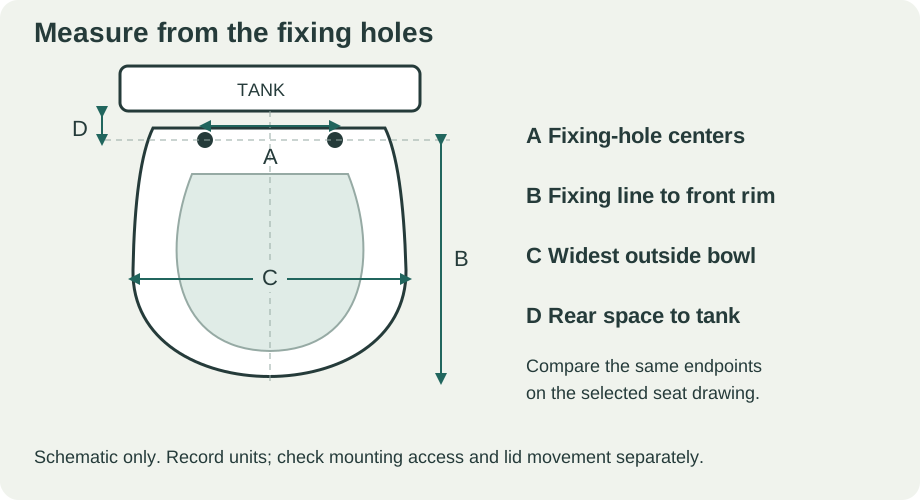
Enlarge diagram
Swipe across to see the rest of the diagram.
Keep four measurements on the same sketch
Use inches throughout or millimeters throughout, and write the unit beside each value. Name the endpoints as well as the number. “Length 18½” is ambiguous if one person measured the old lid and another measured from the bolt line.
Photograph the whole bowl from above, the fixing locations, and the toilet model marking if accessible. Keep the camera square to the surface for identification; perspective in a photo is not an accurate measuring scale. An old seat can have the wrong outline or be sitting too far forward, so its position alone is not a replacement specification.
Scroll across to read every column.
| Record | Measure on the toilet | What still needs checking |
|---|---|---|
| A · fixing centers | Center of left fixing hole to center of right | Allowed mounting positions and the specified hardware |
| B · bowl length | Midpoint of fixing line to front outside rim | Same endpoints on the product drawing; permitted adjustment |
| C · bowl width | Widest outside ceramic rim, left to right | Seat outline and support against the bowl |
| D · rear space | Fixing line back toward tank or other obstruction | Hinge body, raised lid and release movement |
Read a product drawing without mixing its arrows
A listing may give an overall package size, a ring size and a mounting dimension on the same page. Use the dimension drawing for the exact model, not the largest length in the shopping title. Check where each extension line ends before copying a number into B.
For example, the Bemis 1200SLOWT specification labels the seat elongated and shows 5½-inch fixing centers. Its front view includes a 16⅞-inch dimension on the seat body, while the side view shows an 18¾-inch dimension reaching back to the fixing area. The shorter number does not make this a round seat. The two arrows have different endpoints.
Save the complete drawing with the model and revision. If the product page and drawing disagree, ask the manufacturer which applies to the item being sold. A close number is a reason to investigate, not permission to bend hardware or drill the ceramic.
Check whether the mounting hardware can be reached
Look at how the existing fixing is held. A conventional bolt may have a nut accessible below the bowl’s rear ledge. Some enclosed or skirted toilets hide that access. Do not assume that a bolt you can turn from above means any top-fixing kit will fit.
The Bemis Affinity 1200E4CT specification is a useful contrasting example: it identifies a concealed-trapway hardware package for skirted installation, top installation, and ½ inch of front-to-back adjustment. Those features belong to that model and hardware package. They are not shared by every elongated seat or every seat in the same brand.
Before buying, read the selected seat’s installation sheet. Confirm the required access, supplied fasteners and any toilet-model exclusions. If a rubber anchor or metal fixing remains hidden and unidentified, send the model and a photo to the manufacturer rather than assuming the existing kit can be reused.
If the old bolts are seized, the ceramic is cracked, or the fixing area cannot be reached safely, resolve removal before committing to a replacement. Tools can chip porcelain. There is no universal tightening torque or bolt-cutting procedure in this measurement guide.
Compare candidates without declaring a fit too early
Consider a hypothetical bowl measuring 18½ inches from the fixing line to the front, with 5½-inch hole centers. Its mounting access has not yet been identified. No toilet was measured for this example; it shows how to use incomplete information when shopping.
Scroll across to read every column.
| Candidate listing | Decision now | Information still needed |
|---|---|---|
| Round seat; same 5½-inch centers | Reject this shape choice | Matching holes do not compensate for the shorter outline |
| Elongated seat; dimensions shown only as a shipping-box size | Hold | Actual seat drawing and mounting instructions |
| Elongated seat; drawing matches the measured outline | Continue checking | Fixing access, hardware, support and opening clearance |
| Elongated seat with top-mount hardware | Check the exact installation sheet | Approved bowl/hole arrangement and the supplied kit |
Check the sample before ordering for several bathrooms
When the correct seat arrives, keep its hardware and instructions together. Compare it with the recorded bowl before installation. During the manufacturer’s fitting sequence, check alignment, intended bumper contact and the movement of the lid. A hinge can clear the tank when closed yet interfere when raised or released for cleaning.
Follow the model’s installation and tightening sequence. Do not add improvised packing under a bumper to compensate for the wrong contour. Stop using a seat that rocks, slides or cannot be secured as instructed; record where it moves and seek the correct hardware or compatible model.
Measure each toilet before buying multiples. Two white toilets in the same house may have different outlines or fixings. Keep one record per toilet, then group only the confirmed matches into an order.
This guide covers ordinary replacement seats. A powered bidet seat adds its own compatibility, supply and electrical requirements; a conventional seat measurement alone does not approve that installation.
Take the bowl measurements to the supplier.
Open the printable parts recordSources
- Bemis: How to Measure a Toilet Seat ↗
Bowl measurement endpoints and approximate US round/elongated lengths. Checked November 5, 2026.
- Bemis 1200SLOWT specification, 0B7012445A (PDF) ↗
2025 sheet; dimension arrows visually checked. Used to explain measurement endpoints, not to recommend a purchase. Checked November 5, 2026.
- Bemis Affinity 1200E4CT specification, 0B7412195 (PDF) ↗
2022 sheet; top mounting, concealed-trapway hardware and model-specific adjustment. Checked November 5, 2026.
- Bemis: How to Remove and Replace a Toilet Seat ↗
Porcelain precautions and use of the supplied model-specific hardware/instructions. Checked November 5, 2026.