In this guide
Sketch the runs, corners, and gates
Start with the fence system you intend to install. Record its allowed bay spacing, post and footing requirements, rail arrangement, and gate openings beside the sketch. These details determine the shopping list. Check the local height and location requirements before settling the layout.
Sketch the fence from above and give each straight run a label. Show corners, ends, gates, existing structures, grade changes, and any sections that remain. Record exactly what a length represents: overall run length, post-center distance, or clear opening. Mixing those measurements is a common reason that an apparently complete order fails to fit.
How many bays does each run need?
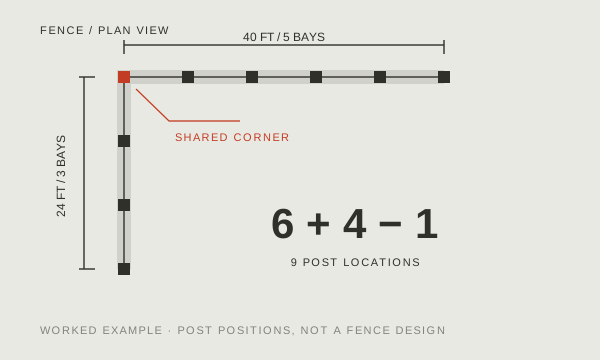
Example assumption: the selected system allows bays up to 8 feet under the same measurement convention throughout. A 40-foot run needs ceiling(40 ÷ 8), or five bays. A 24-foot run needs three. Both have 8-foot equalized bays. Substitute the spacing allowed by your system before using this calculation.
A 25-foot run would need four bays under the same limit, giving 6.25 feet per equal bay. Dividing the total length of several runs at once can conceal the extra bays needed at corners or obstructions. Keep the runs separate until after rounding. Prefabricated panels introduce their own usable widths and trimming constraints, so verify the panel's installation dimensions.
Which posts are shared?
An isolated open run with five bays has six post positions. An isolated three-bay run has four. If those runs meet at one shared corner post, the combined layout has 6 + 4 − 1 = 9 unique post positions. Subtract a shared post only when the actual system permits that one post to serve both runs.
Number every post on the drawing. Check the shared corners against the system's instructions, then check the gates. Each gate needs its specified opening, hardware clearances, supporting posts, and swing space. The width printed on a gate's product listing may not be the required opening between its posts.
Pickets and rails: two different counts
For a defined picket field of width F, picket face width p, and equal interior gap g, n pickets cover n × p + (n − 1) × g. A preliminary count is ceiling((F + g) ÷ (p + g)). This may leave a final picket to trim or require adjusted spacing. It does not choose a permitted gap for a pool enclosure or another regulated barrier.
For example, a 94-inch field with 5.5-inch pickets and 0.5-inch gaps gives ceiling(94.5 ÷ 6) = 16 pickets. Sixteen full pickets and fifteen gaps would cover 95.5 inches, overshooting by 1.5 inches. Resolve that extra width in the spacing or end cuts, then repeat the check for each field.
Three rail rows across eight bays require 24 bay-length rail pieces. Convert those pieces into stock lengths using the chosen design’s splice and attachment details. One long purchased board may supply several pieces, while a long rail may need stock longer than the common shelf length.
From concrete volume to bags
Calculate the concrete volume from the specified footings, then divide the total by the yield printed on the bag. For example, 9 cubic feet ÷ 0.6 cubic feet per bag = 15 bags before reserve. Use the footing dimensions established for your fence and site.
Apply reserve to the items likely to need extras. A 10% reserve on 130 pickets gives 143 pickets. Count gates and hardware from the actual layout. For fasteners, multiply the required fasteners per connection by the number of connections, then round to full boxes. Add caps, delivery, removal, and disposal to the order.
Before the first post hole
Contact 811 before digging, follow your state's waiting period, and confirm all utilities have responded. The 811 guidance explains that marks indicate approximate utility locations; a mark is not a property survey. Verify the fence location and applicable local requirements separately. Keep the final drawing and the supplier's product dimensions with your purchase list so substitutions can be checked against the same assumptions.