Match the mounting-hole spacing first. Then check the screw thread, the actual thickness it passes through, and the room around the handle. A matching length in a shopping title is not enough.
In this answer
Remove one sample and record the holes it leaves
This guide covers rear-mounted knobs and pulls on ordinary cabinet doors and drawer fronts with usable existing holes. Appliance handles, concealed fixings, glass doors, and creating a new hole pattern need their own instructions. Keep the old hardware until one replacement has been fitted successfully.
Choose a representative door and a drawer, because their construction may differ. Open and support the front, protect nearby surfaces, and hold the pull while loosening its screws with the correct hand screwdriver. Keep each sample and its screws together. Do not pry a foot off a finish that has bonded to it.
Inspect the exposed area for cracked material, enlarged holes, an old backplate, and a finish outline larger than the new handle's feet. A loose pull attached through damaged material may need a substrate repair before a replacement will stay secure.
For two-hole pulls, record the distance from the center of one mounting hole to the center of the other. Cross-check at the threaded holes on the back of the removed pull. Liberty's CP4474 installation sheet uses that center-to-center measurement. Overall handle length is a different measurement. If damaged holes make the centers ambiguous, record the uncertainty instead of rounding to a catalog size.
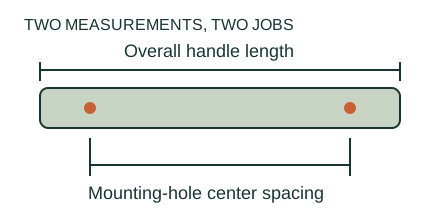
Enlarge diagram
Swipe across to see the rest of the diagram.
Compare the exact size variant, not a rounded label
Keep the original measurement unit beside the number. A 3-inch spacing is 76.2 mm. A 96 mm spacing is about 3.78 inches. Those patterns are not interchangeable. A rounded inch label on a metric product is useful for browsing, but the specified mounting pattern and an actual sample control the fit.
Liberty's Modern Square listing illustrates the distinction: the displayed P41849C-SS-CP variant gives 160 mm mounting centers, expressed as 6-5/16 inches, while overall length is listed as 6.77 inches. The page marks the product discontinued, so it is a specification-reading example, not a current purchase recommendation.
For a listing with several sizes or finishes, save the exact variant code and its drawing. A family photograph can show a different size from the one selected. Do not enlarge existing holes or bend a handle to make the wrong pattern fit.
Scroll across to read every column.
| Candidate information | Decision | Reason |
|---|---|---|
| 96 mm centers; 140 mm overall length; screw details available. | Continue to screw and clearance checks. | It passes the hole-spacing comparison only. |
| “About 4 inches long”; no mounting-center dimension. | Ask for the drawing or exact specification. | Overall length does not locate the screw holes. |
| 3-inch centers. | Reject for direct reuse of these holes. | 76.2 mm is 19.8 mm shorter than 96 mm. |
| 96 mm centers; screw thread unspecified. | Keep as unconfirmed. | Matching centers do not establish fastener compatibility. |
Measure the thickness along the screw's actual path
Look from the inside to establish where the screw head bears. A door may have one panel, while a drawer may have an applied front plus a box front. A recess behind the screw head changes the path again. Measure at the fixing location rather than assuming the edge thickness represents the whole assembly.
Record each layer between the underside of the seated screw head and the handle's threaded entry. Include a backplate or washer only where the selected product calls for it. The length left beyond that stack enters the handle; it must meet the product's required engagement without bottoming out.
Illustrative length check: a 25 mm under-head screw passing through an 18 mm stack leaves 7 mm projecting beyond it. The same screw passing through a 22 mm stack leaves 3 mm. This arithmetic does not tell you whether either length is adequate: the selected handle's thread and engagement requirements still decide.
Amerock's installation guide gives an example of a 3/4-inch applied front plus a 3/4-inch box front, totaling 1-1/2 inches, and specifies a 1-3/4-inch screw for that example. Its general extra-length guidance is not a universal engagement rule for every handle. The same document notes that some Amerock hardware uses metric screws instead of UNC.
Confirm the thread before testing the length
Use the new pull's specified fastener, not whichever old screw looks close. The thread diameter and pitch are separate from length. A #8-32 screw and an M4 screw are different specifications; apparent similarity is not a compatibility test.
Read the selected product's instructions or obtain written confirmation from the supplier. Supplied screws may still be unsuitable for a thicker or recessed front. If the documentation does not state the usable thickness or required fastener, keep the candidate unresolved rather than deriving a universal length from another brand's guide.
When the specified screw is aligned with the threaded entry, start it gently by hand. Stop if it resists immediately, enters at an angle, or becomes tight while the handle remains loose. Those results can indicate a thread, alignment, or length problem; extra force does not identify which one. Inspect and confirm the components before continuing.
Trial-fit one door and one drawer
Set the new pull against the existing holes and check that both feet sit flat. Start both correct screws before snugging either one. Hold the handle aligned and tighten with a hand screwdriver as its instructions specify. Liberty's installation sheet calls for a screwdriver and warns against overtightening. Do not use tightening force to pull a mismatched hole pattern into position.
Check the finish around both feet and feel for movement under a normal opening pull. Open the door slowly through its usual travel, checking adjacent handles, walls, and appliances. On a corner cabinet, test each neighboring front separately. Check finger space under the grip and whether the screw heads interfere with items or internal fittings.
Keep the distinction between a grip problem and a travel problem: replacing the pull cannot correct a drawer that still binds. Use the sticking-drawer diagnosis for that symptom, or the published cabinet-door diagnosis if a hinged front is crooked.
Approve the replacement by location, then count
One successful door sample does not verify every drawer. Group locations by hole pattern, screw-path thickness, and surrounding clearance. Record one verified combination per group on page 3 of the existing hardware measurement sheet.
If the new hardware leaves exposed holes or requires new ones, that is a different scope. Decide how the holes and finish will be repaired before ordering the whole set. A backplate may conceal an old pattern, but it does not make unsupported or damaged material sound.
- Pattern: exact center spacing and undamaged existing holes.
- Fastener: confirmed thread and length for that group's stack.
- Appearance: feet or an approved backplate cover the intended area without concealing an unresolved repair.
- Use: a secure grip, adequate hand clearance, and unobstructed opening.
- Order: exact model, size and finish; quantity per package; any separately required fasteners.
Record the hardware before choosing a replacement.
Open hardware measurement sheetSources
- Liberty Hardware: CP4474 cabinet hardware installation instructions ↗
©2010, PDF page 1, steps 1 and 4 — center spacing, screwdriver installation and overtightening. This article covers replacement through existing holes.
- Liberty Modern Square Pull ↗
displayed P41849C-SS-CP variant, mounting centers, overall length and discontinued status when checked. Listing used only to explain different dimension fields.
- Amerock: Installing New Cabinet Hardware / Replacing Cabinet Hardware ↗
manufacturer-authored guide hosted by Lowe's, PDF page 1 — layered-front example and metric/UNC warning. Publication date is not stated in the document. Its older general guidance does not replace the chosen product's current instructions.