In this guide
Can you keep the baseboards?
Yes, when the existing trim is sound and the complete new wall treatment meets its top edge cleanly. Check the joint from the side before choosing the pattern. A batten that looks right from the front can stick out beyond a thin or rounded baseboard edge.
This guide covers decorative interior battens on a sound, dry wall. The main example keeps a flat-topped baseboard in place and uses the painted wall between battens, with no new backing panel. All dimensions below are illustrative actual measurements, not nominal lumber sizes. A packaged panel system may require a different assembly, gaps or replacement trim; its instructions take priority.
Start with the simplest compatible option: use a suitable thinner batten. If the depth still does not work, compare a properly detailed transition moulding with replacing the baseboard. Caulk cannot turn an unsupported overhang into a flush joint.
Enlarge diagram
Swipe across to see the rest of the diagram.
Measure the joint, not the widest part of the baseboard
Measure outward from the same finished wall face. Record P, the projection of the baseboard at the exact edge where the batten will end; t, the batten thickness; and a, the added build-out behind the batten. Include any backing panel, furring or shims in a. Confirm the installed build-out with a sample assembly rather than assuming an adhesive bead has zero thickness.
The new batten face sits at a + t. The reveal is P − (a + t). A positive value leaves the baseboard projecting beyond the batten; zero aligns the faces; a negative value means the batten overhangs. There is no universal minimum reveal in this calculation. A small positive result is only a geometric check: the top profile, straightness, finish and attachment still need to work.
For a shaped baseboard, its thickest lower belly is not P. A 5/8-inch body with only a 3/8-inch projection at the upper contact edge still leaves a 1/2-inch batten overhanging by 1/8 inch. A curved or sloping top also needs a fitted end or a compatible transition; do not assume it provides the flat landing drawn below.
Scroll across to read every column.
| Measurement | Where to take it | Why it matters |
|---|---|---|
| Top-edge projection P | Wall face to the actual contact edge | Controls the side-profile reveal |
| Batten face width b / thickness t | Two different dimensions on a sample | Width sets spacing; thickness sets projection |
| Added build-out a | Complete installed backing assembly | Moves every new trim face forward |
| Baseboard top elevation B | From one level datum at every batten | Sets individual vertical lengths |
| Top-rail upper edge H / face height r | From the same datum; measure the rail | Lower rail edge is H − r |
| Casing and obstacles | Door trim, full covers and access space | Check end returns and obstructions too |
Three thickness cases with the same baseboard
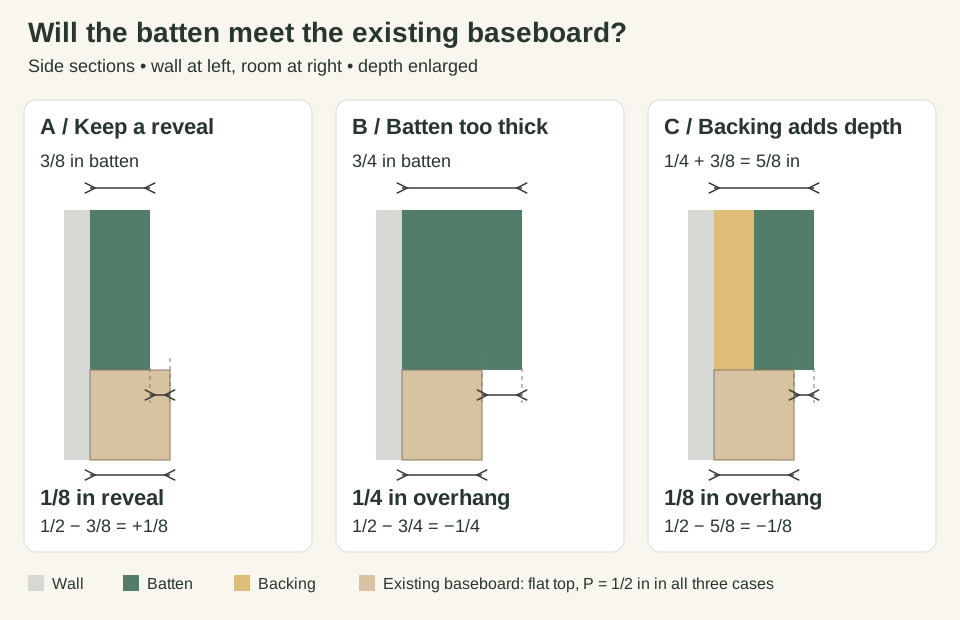
Case A keeps the baseboard with a 1/2-inch flat top projection and uses a 3/8-inch batten directly against the wall. The example assumes no additional installed build-out: 1/2 − 3/8 = 1/8 inch of reveal. This is a candidate to mock up, not an approval to attach any thin strip with any adhesive.
Case B uses a 3/4-inch batten at the same joint. The result is 1/2 − 3/4 = −1/4 inch: a visible 1/4-inch overhang. A 45-degree cut on the batten end does not change the face projection; it creates a different visible end detail. Decide whether that detail is wanted before cutting, rather than using it as an automatic repair.
Case C adds a 1/4-inch backing panel behind the original 3/8-inch batten. The combined depth becomes 5/8 inch and overhangs by 1/8 inch. Repeat this check at the top rail, door casing and exposed ends. Adding backing can change the best baseboard choice even when the batten itself stays the same.
Scroll across to read every column.
| Case | Base edge P | Build-out a + batten t | P − (a + t) |
|---|---|---|---|
| A · thinner batten | 1/2 | 0 + 3/8 = 3/8 | +1/8 reveal |
| B · thicker batten | 1/2 | 0 + 3/4 = 3/4 | −1/4 overhang |
| C · add backing | 1/2 | 1/4 + 3/8 = 5/8 | −1/8 overhang |
Choose a thinner batten, a transition, or replacement
Keep the baseboard and change the batten when a thinner interior trim product provides the appearance and attachment the project needs. If its face width also changes, recalculate the horizontal spacing. Do not confuse a 2.5-inch face width with a 3/8-inch thickness.
Keep the baseboard with a transition only after drawing the actual moulding profile. A compatible cap or transition rail can provide a different meeting edge, but it needs its own supported attachment, ends and corner details. Its top becomes the new lower reference for the battens. Include its projection in the side check and its height in the length calculation; do not count on a decorative strip balancing on a curved baseboard.
Replace the baseboard when the required wall build-out, damaged trim or incompatible profile leaves no satisfactory joint. Check the new profile against door casings and adjacent rooms before buying. Keeping sound existing baseboard means zero new baseboard in the purchase list; replacement quantities belong in a separate material group.
Scroll across to read every column.
| Option | What stays | What must be resolved |
|---|---|---|
| Thinner batten | Existing baseboard and its height | Measured reveal, product attachment, casing |
| Fitted transition | Existing baseboard below a new detail | Support, profile, corners, new contact height |
| Replacement | Existing wall; baseboard is changed | New projection, floor fit and casing junctions |
Worked wall: separate the 51-inch opening from the cut length
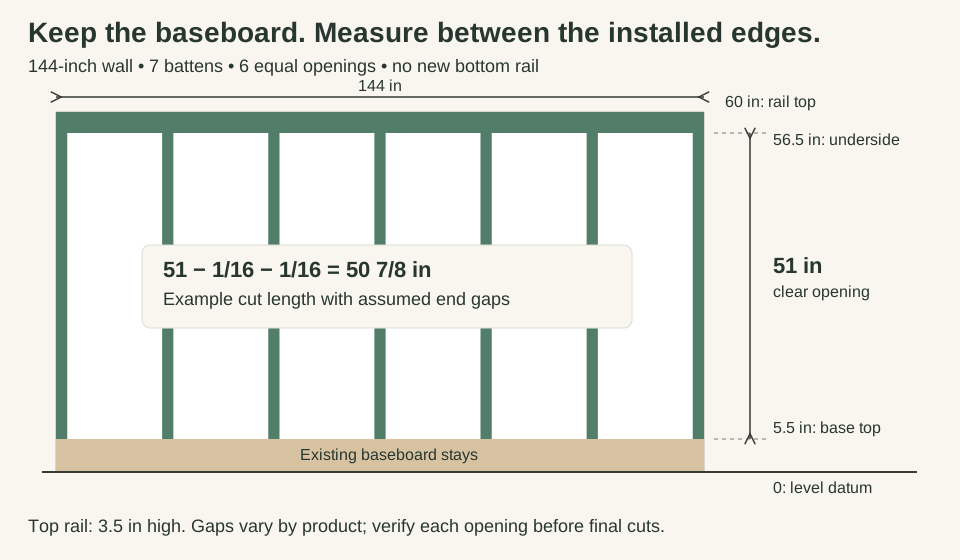
Use a 144-inch wall with seven battens, each 2.5 inches wide and 3/8 inch thick, making six clear openings. Keep a flat-topped baseboard whose top is 5.5 inches above the level datum. Set the upper edge of a 3.5-inch-high top rail at 60 inches above that same datum. The top rail is also 3/8 inch thick; there is no backing panel or separate bottom rail.
The top rail’s lower edge is 60 − 3.5 = 56.5 inches. The clear vertical opening above the existing baseboard is 56.5 − 5.5 = 51 inches. That opening is not automatically the finished batten length. Subtract the top and bottom gaps required by your selected trim system, then check the fit at each position.
For this arithmetic example only, suppose the selected detail calls for a 1/16-inch gap at each end. The finished batten is 51 − 1/16 − 1/16 = 50 7/8 inches (50.875). The gap assumption is not a general installation recommendation. If your product calls for different clearances, replace both allowances before using the cut list.
At a position where the existing baseboard rises to 5 5/8 inches, the same level top rail leaves only 50 7/8 inches of opening. With the example gaps, that batten becomes 50 3/4 inches. Label pieces by position and measure each opening; seven identical lengths are valid only for the level example.
Scroll across to read every column.
| Item | Calculation | Result |
|---|---|---|
| Clear gap width | (144 − 7 × 2.5) ÷ 6 | 21.0833 in |
| Center-to-center repeat | 21.0833… + 2.5 | 23.5833… in |
| Vertical opening | 60 − 3.5 − 5.5 | 51 in |
| Example finished batten | 51 − 1/16 − 1/16 | 50 7/8 in |
| New vertical trim | 7 × 50.875 | 356.125 in |
| New top rail | 1 × 144; verify end fit | 144 in planning length |
| New baseboard / bottom rail | Retained existing baseboard | 0 pieces |
Enlarge diagram
Swipe across to see the rest of the diagram.
Use the wall planner for spacing and the cut planner for this list
The wall planner can check the six-gap horizontal layout and measured obstructions. It currently assumes equal-width top and bottom rails and does not model an existing baseboard with a differently sized top rail. The linked preset therefore previews spacing only: its 60-inch model produces 55-inch verticals and two 144-inch rails, which are NOT this example’s purchase list. Do not send that generated list unchanged to the cut planner.
For this retained-baseboard detail, enter the measured pieces directly into the cut-list planner. In the level example with the stated gap assumptions, enter seven 50.875-inch battens. Make a separate comparison for the one 144-inch top rail because its 3.5-inch face width differs from the battens’ 2.5-inch width. Same thickness or paint color does not make two widths interchangeable stock.
For the seven battens, a planning comparison with 1/8-inch kerf and 1/4-inch cleanup at EACH end needs seven 96-inch boards, or four 120-inch boards, or four 144-inch boards. Only two of these battens fit on each 120- or 144-inch board. These counts exclude spare boards and defects; enter supplier prices to compare cost.
A continuous 144-inch rail cannot come from a nominal 144-inch board after reserving 1/4 inch at each end: only 143.5 inches remain. Use suitably longer actual stock or separately design and measure a joint. The cut planner will flag a piece that does not fit; it does not design the joint for you. Save or export each profile’s comparison before replacing its inputs.
Dry-fit the detail before fastening
Hold a sample of the full assembly at the baseboard, beside a door casing and at an exposed end. View it from the doorway as well as straight on. Check the reveal at several places; a wavy wall or a thicker adhesive build-out can consume the small reveal in Case A.
Tape the layout on the wall. Check the whole outlet or switch cover and the space needed to remove it, along with doors, furniture and heat sources. Do not cover electrical boxes or assume the obstruction checker approves electrical clearances. If added backing changes the device-to-wall relationship, resolve it with a qualified electrician before covering the wall.
Mark the top rail from a level datum and measure each batten opening after the horizontal detail is established. Follow the chosen material’s installation instructions for surface preparation, conditioning, clearances, adhesive, fasteners and finish. Decorative trim is not attached by resting it on the baseboard; no universal nail length or glue pattern is specified here.
Before disturbing old paint, check its history. In US homes built before 1978, EPA recommends a lead-safe certified contractor for renovation work and testing to determine whether lead paint is present. Keeping the baseboard does not eliminate dust risks from drilling, scraping or sanding nearby painted surfaces.
Where these dimensions and instructions come from
The side sections, 144-inch wall, thickness comparisons and cut quantities are HouseHows worked examples. They are not manufacturer-tested assemblies or measurements from a completed installation. Recalculate them for the trim you select.
Home Depot’s baseboard guidance covers checking dimensions, fitting trim to uneven surfaces and handling small fitting gaps. Dakota’s interior board-and-batten instructions show that backing, attachment and clearances depend on the specific system; they are not specifications for the generic profiles in this example. Sources reviewed October 24, 2026.